
Introduction
Let’s kickstart the LinkedIn Clone series by building the User Interface using React Native and Expo.
This is a great hands-on tutorial for building cross-platform apps for Web and Mobile with a modern stack:
- React Native and Expo
- Expo Router
- Typescript
Video tutorial
This guide was designed to be used together with the video tutorial. Open it in a new tab, and let’s get started.
Asset Bundle
The Asset bundle contains all the required assets to help you follow along.
Download Asset BundleCreate a new Expo project
Let’s start by creating a new React Native application using Expo. We will use the tabs template, which comes with Expo Router configures, and a couple of sample screens.
npx create-expo-app@latest LinkedIn -t tabs@sdk-49
After the project is initialized, let’s open it up in our editor of choice.
Open a terminal, and start the development server with npm start
The next step is to run our app on a device. The easiest way is to download the Expo Go app (available both on Play Market and App Store), and then scan the QR you see in the terminal. That way, you can continue to develop the app and see the hot updates directly on your device.
Optionally, you can run the app on an iOS Simulator by pressing i or on Android Emulator by pressing a. But for this, you have to set up the emulators using Xcode and/or Android Studio.
Clean the template
Let’s clean up a bit the default template to make our work easier later.
- Move the folders app, components, and constants inside a new src directory to keep everything close together.
- Fix all the imports
- Remove unused components
Setup all the Tabs
Let’s set up all the tabs in our Bottom Tab navigator. For every screen we have in the bottom tabs, we have to create a new file inside src/app/(tabs)
- index.tsx
- network.tsx
- new-post.tsx
- notifications.tsx
- jobs.tsx
Initially, all these screens will simply render their title, and later we will implement them. You can use this code for the boilerplate
import { StyleSheet, Text, View } from 'react-native';export default function NetworkScreen() {return (<View style={styles.container}><Text style={styles.title}>Network Screen</Text><Text>Coming soon!</Text></View>);}const styles = StyleSheet.create({container: {flex: 1,alignItems: 'center',justifyContent: 'center',},title: {fontSize: 26,fontWeight: 'bold',marginBottom: 10,},});
Now, we should see separate tabs for every screen we added, but they are lacking a proper icon and title. We can configure these options inside the src/app/(tabs)/_layout.tsx file, which is responsible for the TabNavigator. In this file, we can drop down to the React Navigation level, and configure the screens using the options property.
💡 All the properties available in React Navigation will also work here because Expo Router is built on top of React Navigation.
We will set the title and the tabBarIcon options for all our tabs.
<Tabs.Screenname="network"options={{title: "My Network",tabBarIcon: ({ color }) => <TabBarIcon name="group" color={color} />,}}/><Tabs.Screenname="new-post"options={{title: "Post",tabBarIcon: ({ color }) => (<TabBarIcon name="plus-square" color={color} />),}}/><Tabs.Screenname="notifications"options={{title: "Notifications",tabBarIcon: ({ color }) => <TabBarIcon name="bell" color={color} />,}}/><Tabs.Screenname="jobs"options={{title: "Jobs",tabBarIcon: ({ color }) => (<TabBarIcon name="briefcase" color={color} />),}}/>
Home Feed
Now that we have the basic structure of our application, let’s start working on the main screen which is the Home Feed.
Before we jump into rendering a list of posts, let’s start with rendering just one. As we will need to render posts in different parts of the application, it will be really handy if we create the post as a separate and reusable component.
PostListItem
Create the file for our new components inside src/components/PostListItem.tsx and let’s build the user interface.
Follow the video tutorial for a step-by-step build of this component. Here we have the final result.
import { View, Text, StyleSheet, Image } from 'react-native';import { Post } from '@/types';import { FontAwesome } from '@expo/vector-icons';type PostListItemProps = {post: Post;};type FooterButtonProp = {text: string;icon: React.ComponentProps<typeof FontAwesome>['name'];};const FooterButton = ({ text, icon }: FooterButtonProp) => (<View style={styles.footerButton}><FontAwesome name={icon} size={16} color="gray" /><Text style={styles.footerButtonText}>{text}</Text></View>);const PostListItem = ({ post }: PostListItemProps) => {return (<View style={styles.container}><View style={styles.header}><Image source={{ uri: post.author.image }} style={styles.userImage} /><View><Text style={styles.userName}>{post.author.name}</Text><Text style={styles.position}>{post.author.position}</Text></View></View><Text style={styles.content}>{post.content}</Text>{post.image && (<Image source={{ uri: post.image }} style={styles.postImage} />)}<View style={styles.footer}><FooterButton text="Like" icon="thumbs-o-up" /><FooterButton text="Comment" icon="comment-o" /><FooterButton text="Share" icon="share" /></View></View>);};const styles = StyleSheet.create({container: {backgroundColor: 'white',maxWidth: 600,width: '100%',alignSelf: 'center',},header: {flexDirection: 'row',alignItems: 'center',padding: 10,},userImage: {width: 50,aspectRatio: 1,borderRadius: 25,marginRight: 10,},userName: {fontWeight: '600',marginBottom: 5,},position: {fontSize: 12,color: 'grey',},content: {margin: 10,marginTop: 0,},postImage: {width: '100%',aspectRatio: 1,},footer: {flexDirection: 'row',justifyContent: 'space-around',paddingVertical: 10,borderTopWidth: 1,borderColor: 'lightgray',},footerButton: {flexDirection: 'row',alignItems: 'center',},footerButtonText: {marginLeft: 5,color: 'gray',fontWeight: '600',},});export default PostListItem;
To see the component on the screen, we have to import and render it inside src/app/(tabs)/index.tsx
import posts from '../../../assets/data/posts.json';import PostListItem from '@/components/PostListItem';export default function HomeFeed() {return <PostListItem post={posts[1]} />;}
At this point, we should see one post rendered on the screen.

Infinite scrollable feed using a FlatList
If we can render one post, we can render a list of them. For that, we will use a FlatList component from React Native, that is designed for rendering long lists of data, usually infinite scrollable.
import { FlatList } from 'react-native';import posts from '../../../assets/data/posts.json';import PostListItem from '@/components/PostListItem';export default function HomeFeed() {return (<FlatListdata={posts}renderItem={({ item }) => <PostListItem post={item} />}contentContainerStyle={{ gap: 10 }}showsVerticalScrollIndicator={false}/>);}
Post Details Screen
Every post should have its own screen. This is required if we want to have deep-link to specific posts. For example, if someone likes your posts, when you press on that notification, we want to open the Post details screen.
To set up the screen, create a new file src/app/posts/[id].tsx. The [id] from the file name serves as the dynamic part of the URL. With this approach, if we navigate to /posts/123 then the id will be parsed from the URL and will be 123.
import { Text } from 'react-native';import { useLocalSearchParams } from 'expo-router';import posts from '../../../assets/data/posts.json';import PostListItem from '@/components/PostListItem';const PostDetails = () => {const { id } = useLocalSearchParams();const post = posts.find((p) => p.id === id);if (!post) {return <Text>Not found</Text>;}return <PostListItem post={post} />;};export default PostDetails;
Now, if we run the app on the web, and manually change the URL to http://localhost:8081/posts/2, we should see the post displayed.
However, we must navigate to this page when we press on a post inside the feed. Let’s use the <Link> component from Expo Router inside the components/PostListItem.tsx.
Wrap the whole component inside:
<Link href={`/posts/${post.id}`} asChild><Pressable style={styles.container}>... the rest of your componet</Pressable></Link>
Now when we press on the component inside the feed, we are redirected to the details page.
Profile Screen
We also need a separate screen for the User Profile Screen. Let’s create it inside app/users/[id].tsx. The profile screen is made of:
- Header
- Background Image
- Profile picture
- Name and Position
- Connect button
- About section
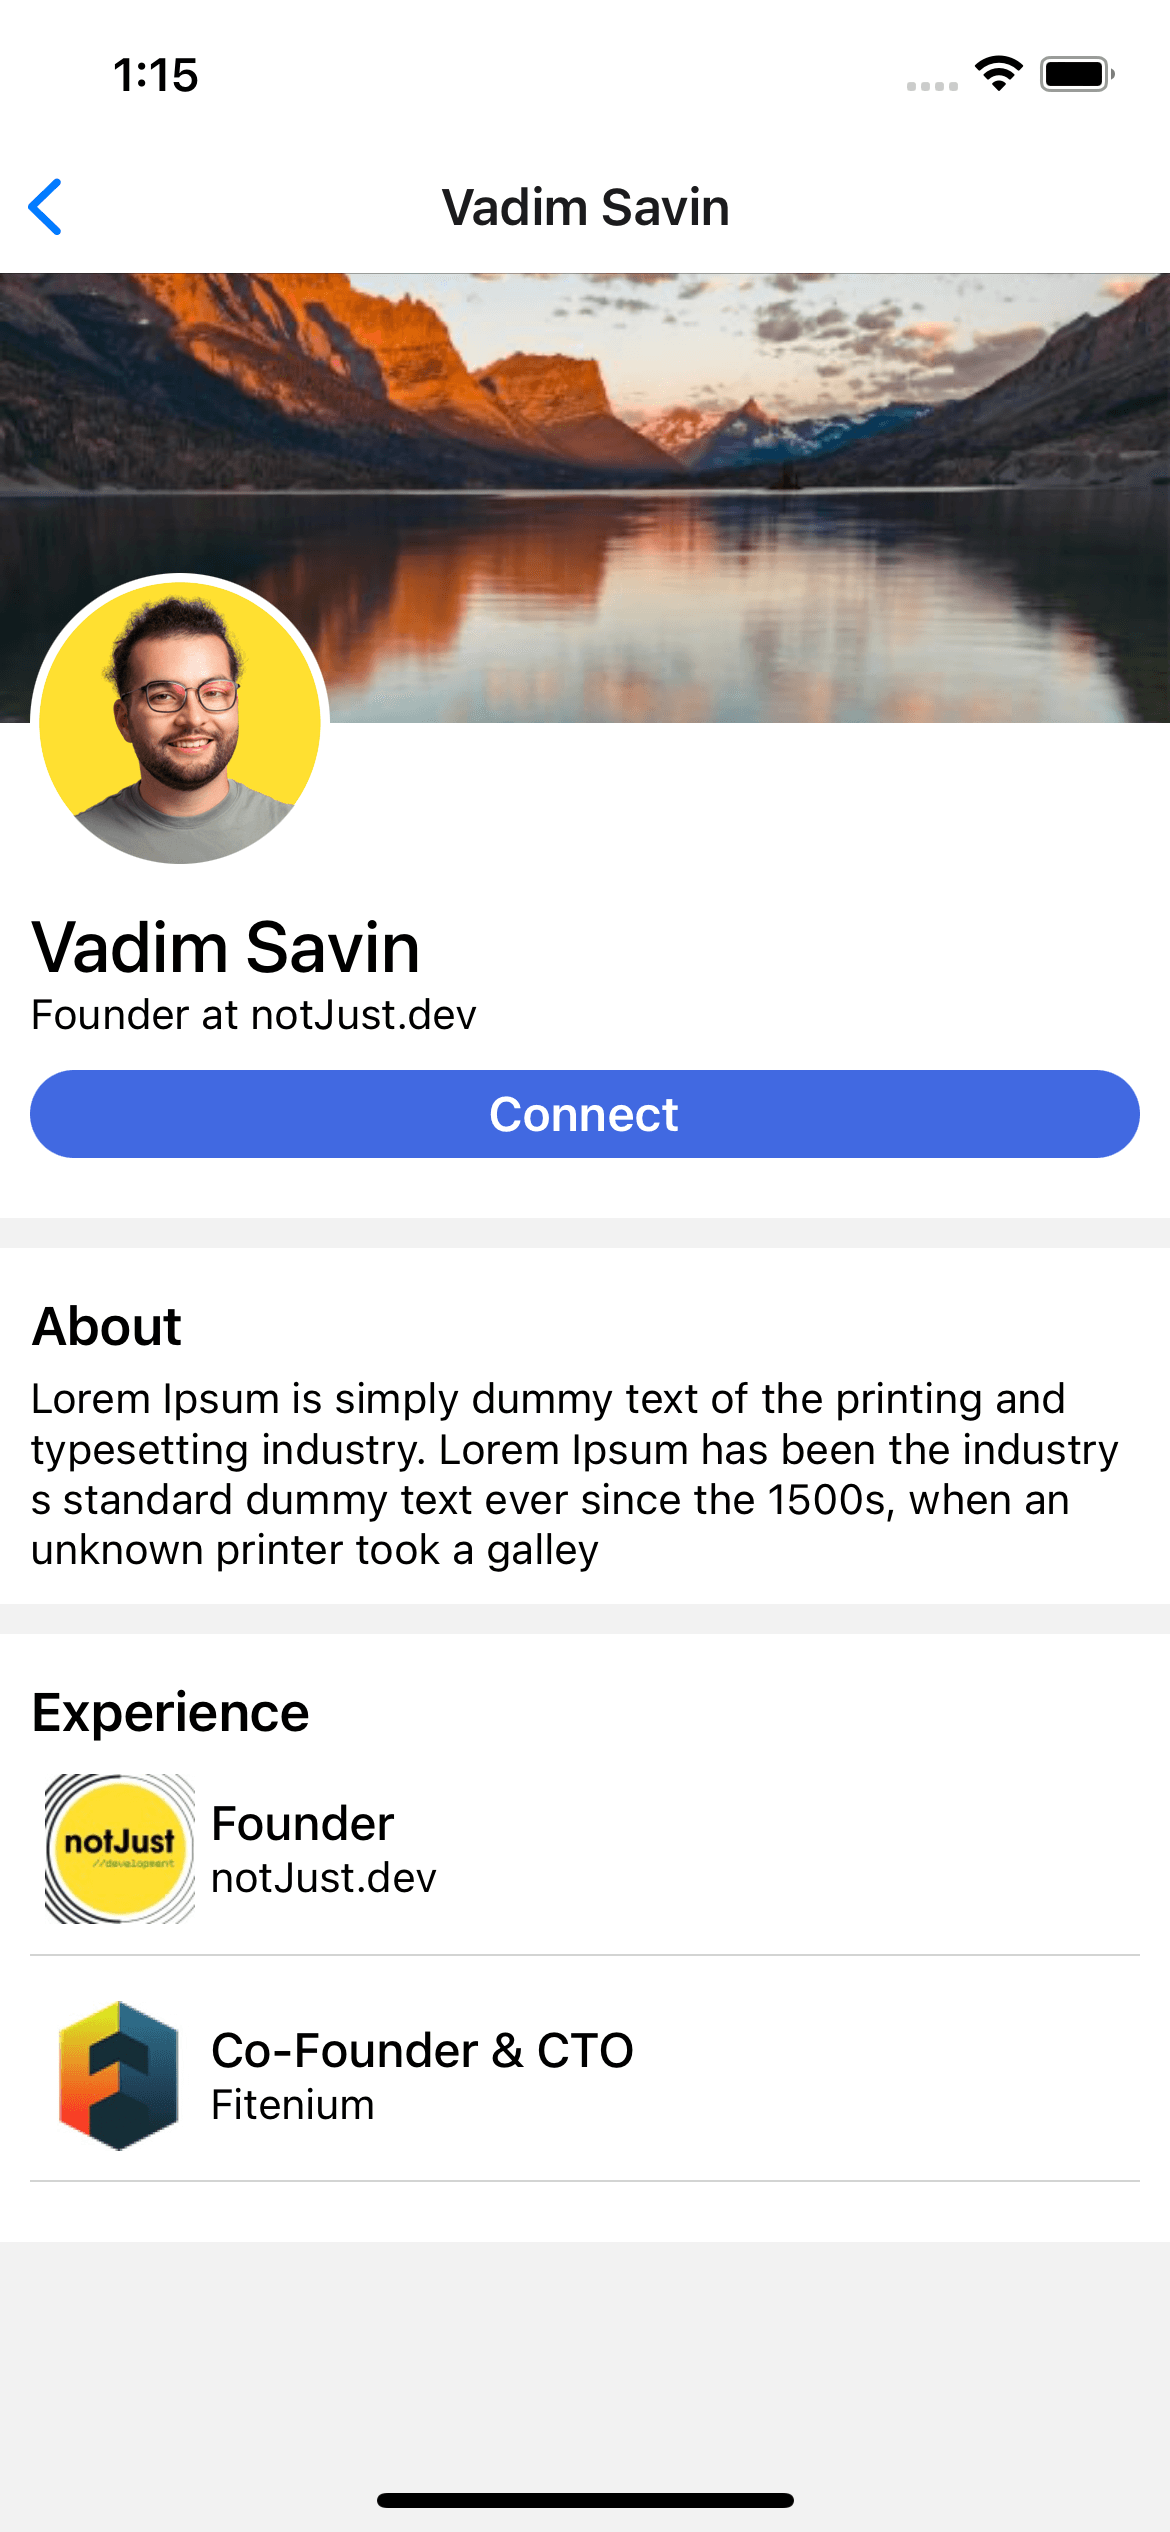
Here is the final code for this screen.
import {View,Text,StyleSheet,Image,Pressable,ScrollView,} from 'react-native';import React, { useLayoutEffect, useState } from 'react';import dummyUser from '../../../assets/data/user';import { useLocalSearchParams, useNavigation } from 'expo-router';import { User } from '@/types';const UserProfile = () => {const [user, setUser] = useState<User>(dummyUser);const { id } = useLocalSearchParams();const navigation = useNavigation();useLayoutEffect(() => {navigation.setOptions({ title: user.name });}, [user]);return (<ScrollView><View style={styles.headerContainer}><Image source={{ uri: user.backImage }} style={styles.backImage} /><View style={styles.headerContent}><Image source={{ uri: user.image }} style={styles.image} /><Text style={styles.name}>{user.name}</Text><Text>{user.position}</Text><Pressable style={styles.button}><Text style={styles.buttonText}>Connect</Text></Pressable></View></View>{user.about && (<View style={styles.container}><Text style={styles.title}>About</Text><Text>{user.about}</Text></View>)}<View style={styles.container}><Text style={styles.title}>Experience</Text></View></ScrollView>);};const styles = StyleSheet.create({container: {padding: 10,marginVertical: 5,backgroundColor: 'white',},headerContainer: {marginBottom: 5,backgroundColor: 'white',},headerContent: {padding: 10,},title: {fontSize: 18,fontWeight: '600',marginVertical: 5,},backImage: {width: '100%',height: 150,marginBottom: -60,},image: {width: 100,aspectRatio: 1,borderRadius: 100,borderWidth: 3,borderColor: 'white',marginBottom: 10,},name: {fontSize: 24,fontWeight: '500',},button: {backgroundColor: 'royalblue',padding: 5,borderRadius: 100,alignItems: 'center',marginVertical: 10,},buttonText: {color: 'white',fontWeight: '600',fontSize: 16,},});export default UserProfile;
Experience
To render a list of work-related experience, we have to need an ExperienceListItem component
import { Experience } from "@/types";import { View, Text, StyleSheet, Image } from "react-native";type ExperienceListItemProps = {experience: Experience;};const ExperienceListItem = ({ experience }: ExperienceListItemProps) => {return (<View style={styles.container}><Image source={{ uri: experience.companyImage }} style={styles.image} /><View><Text style={styles.title}>{experience.title}</Text><Text>{experience.companyName}</Text></View></View>);};const styles = StyleSheet.create({container: {padding: 5,paddingBottom: 10,marginBottom: 10,borderBottomWidth: 0.5,borderColor: "lightgray",flexDirection: "row",alignItems: "center",},image: {width: 50,aspectRatio: 1,marginRight: 5,},title: {fontSize: 16,fontWeight: "500",},});export default ExperienceListItem;
Inside the profile screen, we can render it by mapping through all the experiences from the user data.
<View style={styles.container}><Text style={styles.title}>Experience</Text>{user.experience?.map((experience) => (<ExperienceListItem experience={experience} key={experience.id} />))}</View>
Bonus screens
So far, we have built 3 important screens for the Home Feed, Post details, and User Profile.
To make this app complete, we will also need a way to upload posts, maybe leave comments, and search for users and posts.
Let’s build these screens together in the live stream.
Next steps
This was just part one of this series in which we build the user interface of LinkedIn.
To make this app functional, we need a backend for it.
In the next part, we will build a scalable and secure GraphQL API using StepZen and PostgreSQL as a database.
Check other episodes from the Build Your Own Full-stack LinkedIn Clone series