
Introduction
In this tutorial, we will build a production-ready backend for the LinkedIn Clone.
We will start with designing and setting up the Relationship Database. Then we will build a GraphQL API using StepZen and query the API from the React Native LinkedIn app. We will also implement an authentication flow using Clerk.
The tech stack:
- PostgreSQL deployed to Neon.tech
- StepZen for the GraphQL API
- Apollo Client to query the API from React Native
- Clerk.com for User Authentication
This is a powerful stack that is free to get started, and also scalable to meet the requirements of apps of any size.
Video tutorial
This guide was designed to be used together with the video tutorial. Open it in a new tab, and let’s get started.
Asset Bundle
The Asset bundle contains the starter project for the LinkedIn UI and other important assets.
Download Asset BundleThis tutorial is sponsored by StepZen
StepZen is a GraphQL server with a unique architecture that helps you build APIs fast and with less code. All you have to do is write a few lines of declarative code and let StepZen do the hard work related to building scalable and performant GraphQL APIs.
Sign up for a free StepZen account: https://bit.ly/3OcTJ1U
Run the starter project
If you have followed the first part of this project LinkedIn UI with React Native, and you have followed along, implementing all the screens we’ve built, then you can continue with your project.
For everyone else, or if you want to be sure we are starting from the same point, download the Asset Bundle above, and there is the source code of the UI.
Unzip the LinkedInStarter.zip and open it in Visual Studio Code.
Install dependencies by running npm install.
Start the development server with npm start and run the application on either an emulator or directly on your device using the Expo Go app.
Now you should be able to explore the application we will work with today.
It has a couple of important screens: Home Feed, Post page, Profile page, New post page and Search page. Go ahead and see how they look and think about what data we will need in our backend.

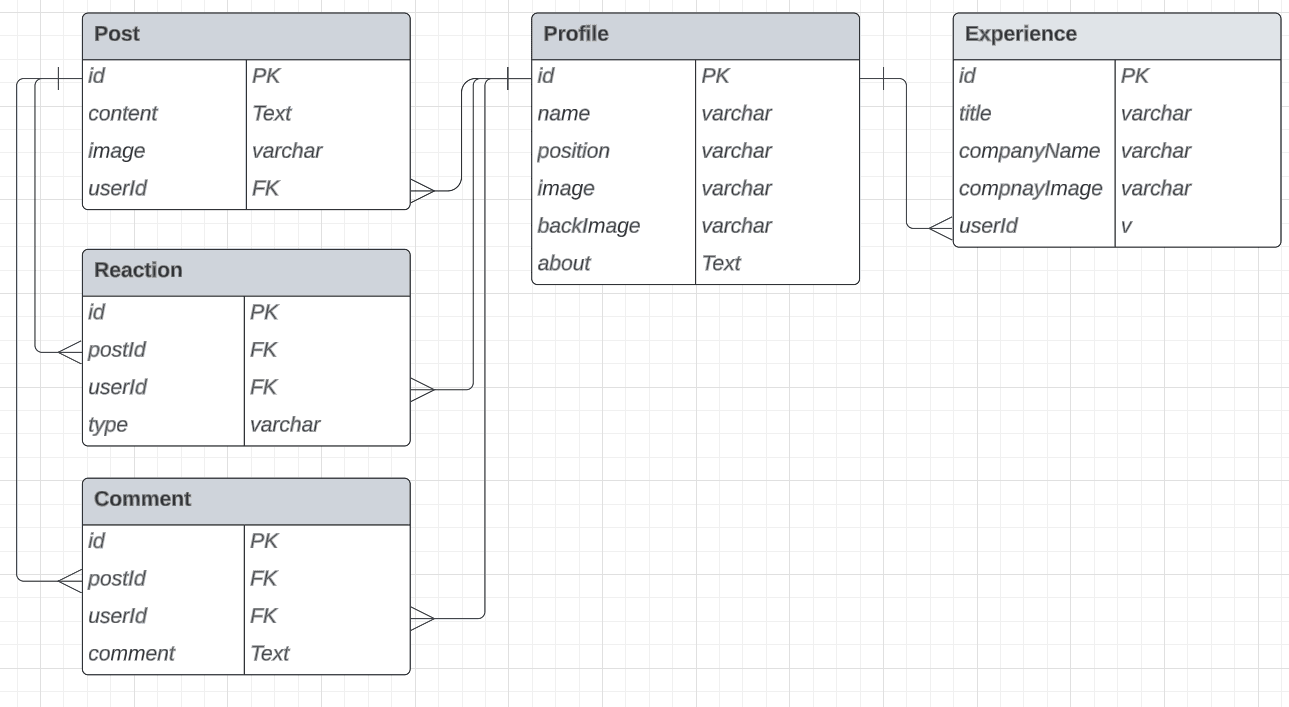
Database Design
For the Database, we will use PostgreSQL, which is a powerful Relational Database. Let’s start by designing what tables we will need, and what will be the relationship between them.
Setup the database
There are multiple options to host a PostgreSQL database. You can run it locally on your machine, you can host it on a server or use a managed solution like AWS RDS, or you can use a service that can simplify the whole process.
For this tutorial, I tried multiple solutions, and finally, I landed on Neon.tech. I found it really easy and intuitive to set up and interact with your database, and they also offer a generous free tier.
Sign up and create a new project. Now we have a PostgreSQL database ready.
Create all the tables
Our database is still empty. Let’s create all the tables we will need in this tutorial using standard SQL queries based on our database design.
Open the SQL Editor page inside the Neon console, and paste the next SQL Query.
CREATE TABLE Profile (id BIGINT GENERATED BY DEFAULT AS IDENTITY PRIMARY KEY,name VARCHAR(255),position VARCHAR(255),image VARCHAR(255),backImage VARCHAR(255),about TEXT,authId VARCHAR(255) UNIQUE);CREATE TABLE Experience (id BIGINT GENERATED BY DEFAULT AS IDENTITY PRIMARY KEY,title VARCHAR(255),companyName VARCHAR(255),companyImage VARCHAR(255),userId BIGINT REFERENCES Profile(id) ON DELETE CASCADE);CREATE TABLE Post (id BIGINT GENERATED BY DEFAULT AS IDENTITY PRIMARY KEY,content TEXT,image VARCHAR(255),userId BIGINT REFERENCES Profile(id) ON DELETE CASCADE);CREATE TABLE Reaction (id BIGINT GENERATED BY DEFAULT AS IDENTITY PRIMARY KEY,postId BIGINT REFERENCES Post(id) ON DELETE CASCADE,userId BIGINT REFERENCES Profile(id) ON DELETE CASCADE,type VARCHAR(255));CREATE TABLE Comment (id BIGINT GENERATED BY DEFAULT AS IDENTITY PRIMARY KEY,postId BIGINT REFERENCES Post(id) ON DELETE CASCADE,userId BIGINT REFERENCES Profile(id) ON DELETE CASCADE,comment TEXT);
Insert some data
Let’s also insert some data to help us explore further.
Execute the next SQL commands in the SQL Editor.
-- Insert ProfileINSERT INTO Profile (id, name, position, image, backImage, about) VALUES(1, 'Jeff Bezon', 'Intern @Amazon', 'https://notjustdev-dummy.s3.us-east-2.amazonaws.com/avatars/jeff.jpeg', NULL, NULL),(2, 'Vadim Savin', 'Founder at notJust.dev', 'https://notjustdev-dummy.s3.us-east-2.amazonaws.com/avatars/vadim.png', 'https://notjustdev-dummy.s3.us-east-2.amazonaws.com/images/2.jpg', 'Lorem Ipsum is simply dummy text of the printing and typesetting industry. Lorem Ipsum has been the industry s standard dummy text ever since the 1500s, when an unknown printer took a galley'),(3, 'Peter Johnson', 'CTO at Facebook', 'https://notjustdev-dummy.s3.us-east-2.amazonaws.com/avatars/zuck.jpeg', NULL, NULL),(4, 'StepZen, an IBM Company', 'GraphQL server with unique architecture', 'https://notjustdev-dummy.s3.us-east-2.amazonaws.com/avatars/stepzen.jpeg', NULL, NULL);-- Insert PostINSERT INTO Post (id, content, image, userId) VALUES(2, 'What does notJust Developer mean to you?', 'https://notjustdev-dummy.s3.us-east-2.amazonaws.com/pinterest/0.jpeg', 2),(4, 'Become a GraphQL Ninja with StepZen 🚀', 'https://notjustdev-dummy.s3.us-east-2.amazonaws.com/images/stepzen-stickers.png', 4),(1, 'Exciting news! Just landed an internship at Amazon. I figured it''s about time I try out this whole e-commerce thing. 😄 #NewBeginnings #FromCEOtoIntern', NULL, 1),(3, 'Join me for a talk on scaling technology in startups', NULL, 3);-- Insert Reaction (likes)INSERT INTO Reaction (postId, userId, type) VALUES(2, 2, 'like'),(4, 4, 'like'),(1, 1, 'like'),(3, 3, 'like');-- Insert CommentINSERT INTO Comment (postId, userId, comment) VALUES(2, 4, 'notJust Developers are changing the world one line of code at a time'),(2, 1, 'nice hoodie!');-- Insert ExperienceINSERT INTO Experience (id, title, companyName, companyImage, userId) VALUES(1, 'Founder', 'notJust.dev', 'https://media.licdn.com/dms/image/C4E0BAQGmtxs_h3L1fg/company-logo_100_100/0/1646644437762?e=1697673600&v=beta&t=krLyDvQnoEVEBn1MlGrFEM8cpt5Y24XvXJV7RjXyGsc', 2),(2, 'Co-Founder & CTO', 'Fitenium', 'https://media.licdn.com/dms/image/C4D0BAQHg4ra02yFrcw/company-logo_200_200/0/1573813337379?e=1697673600&v=beta&t=3wUnjLtfkYpIMJg4ZP2qq7Vj0rvU7aUOVrkffLabTuQ', 2);
Query a table
Now that we have our tables created and we added some data, let’s query the tables and make sure everything is ready for the next step. The following command should select all the rows and columns from the Post table and display them in the table below.
SELECT * From Post;
GraphQL API with StepZen
At this moment, we have a React Native application and a Database.
What we are still missing, is a backend API between the client and the database.
Let’s build a GraphQL API, because it will make querying the correct data easier and more optimal.
▶️ Check out this video to learn more about the benefits of GraphQL APIs
The easiest way to build a scalable GraphQL API is StepZen. With one simple CLI command, we will have a GraphQL API up and running. It’s really that simple.
Setup the StepZen CLI
- Let’s install stepzen CLI using npm install -g stepzen.
- Sign up for a free StepZen account
- Login inside your terminal using stepzen login and provide the details from StepZen Dashboard
Create a GraphQL API based on a PostgreSQL database
Docs: https://stepzen.com/docs/quick-start/with-database-postgresql
We are ready to create our GraphQL API.
Create a new folder inside our React Native project, and navigate there:
mkdir stepzen && cd stepzen
Now all we have to do, is run a command and provide the configuration of the DB from Neon
stepzen import postgresql
After some ✨Magic✨ from StepZen, we have a GraphQL schema automatically generated based on our tables from the database. Open the stepzen/postgresql/index.graphql file and explore the schema.
Deploy the API
Deploying and running the API is as easy as it was creating it. Just run stepzen start and StepZen will deploy the API endpoint to their cloud and you will receive a link for the GraphQL explorer.
Open the explorer and run your first query.
Query a GraphQL API in React Native with Apollo Client
Docs: https://www.apollographql.com/docs/react/get-started
Apollo Client is a great library for fetching data from a GraphQL API. It also comes with a powerful caching mechanism that helps improve the performance of the application.
Let’s start by installing it inside our React Native project
npm install @apollo/client graphql
Now, let’s create a new file src/apollo/Client.tsx, and initialize Apollo by connecting it to our GraphQL endpoint.
import { ApolloClient, InMemoryCache, ApolloProvider } from '@apollo/client';const client = new ApolloClient({uri: 'https://<ACCOUNT_NAME>].stepzen.net/api/<API_NAME>/__graphql',headers: {'Authorization':'apikey <API_KEY>'},cache: new InMemoryCache(),});export default client;
Having this client, we need to make it available on all our screens. For that, let’s open src/app/_layout.tsx and wrap our RootLayoutNav inside ApolloProvider
import client from '@/apollo/Client';import { ApolloProvider } from '@apollo/client';...function RootLayoutNav() {const colorScheme = useColorScheme();return (<ApolloProvider client={client}>...</ApolloProvider>);}
Query posts on the home feed
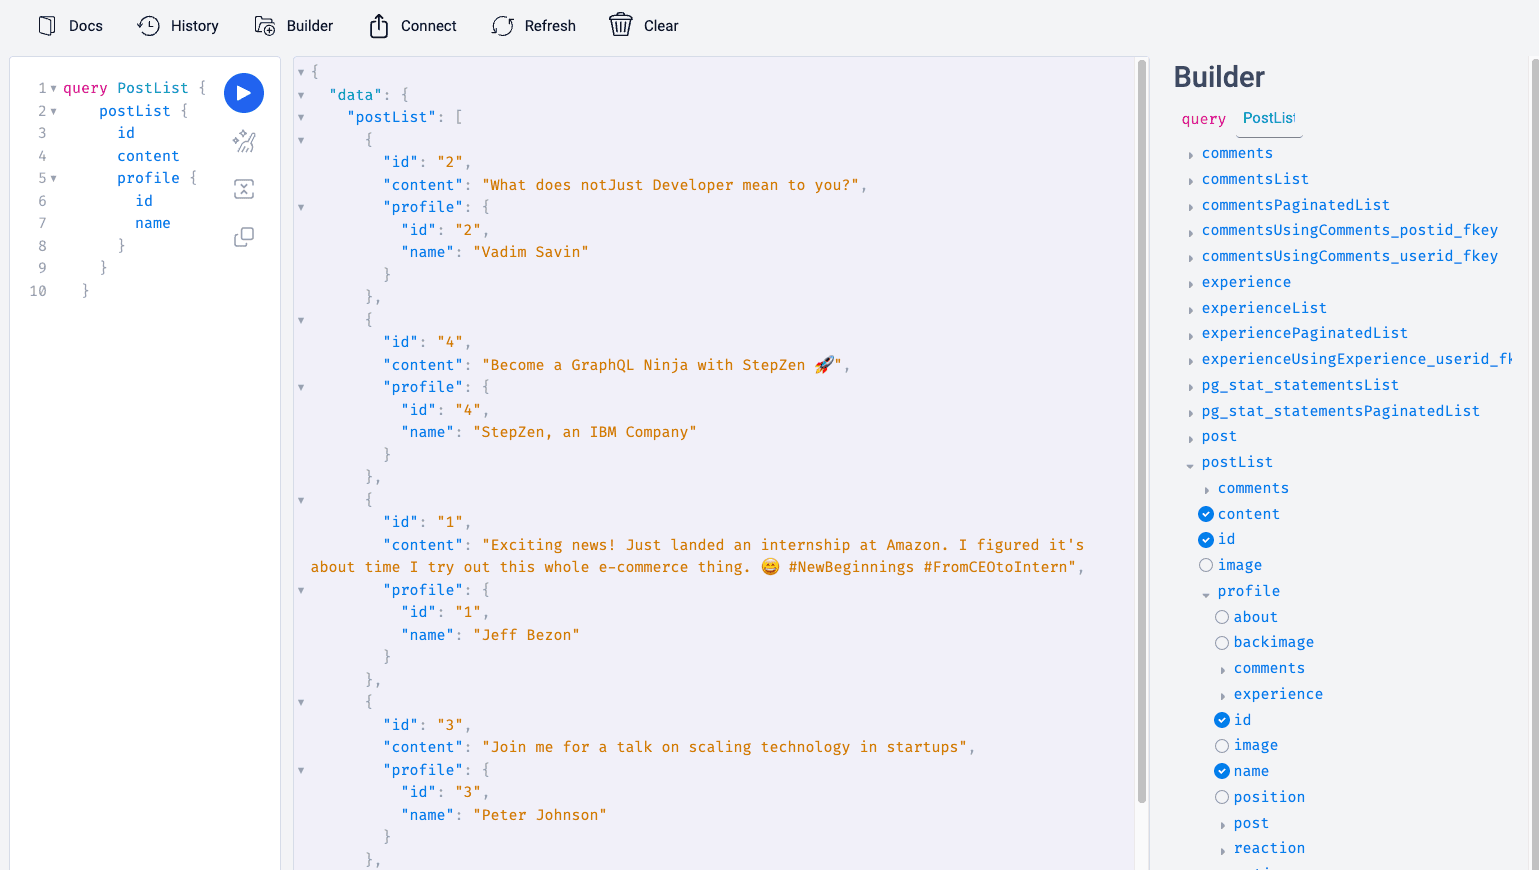
We are ready to query the first data from our API inside our Home Feed. Open src/app/(tabs)/index.tsx, define the query and use the useQuery hook to fetch data.
import { gql, useQuery } from '@apollo/client';const postList = gql`query postList {postList {idimagecontentprofile {imageidnameposition}}}`;export default function HomeFeedScreen() {const { loading, error, data } = useQuery(postList);if (loading) return <ActivityIndicator />;if (error) {console.log(error);return <Text>Something went wrong...</Text>;}console.log(data.postList);...}
Run a mutation
While Queries are for fetching data, Mutations are the GraphQL operation intended to create or update data.
Let’s execute a mutation to create a new post inside our New post page (src/app/(tabs)/new-post.tsx).
import { gql, useMutation } from '@apollo/client';const insertPost = gql`mutation MyMutation($content: String, $image: String, $userId: ID) {insertPost(content: $content, image: $image, userid: $userId) {contentidimageuserid}}`;export default function NewPostScreen() {...const [handleMutation, { loading, error, data }] = useMutation(insertPost);const onPost = async () => {console.warn(`Posting: ${content}`);try {await handleMutation({ variables: { content, userId: 1 } });router.push('/(tabs)/');setContent('');setImage(null);} catch (e) {console.log(e);}};
Paginated Queries
In most applications, you might want to render long lists of data. For example, on the home feed, we are rendering all the posts from the Database. Now it works, but when we will have more posts in the database, it will take a long time to load them all.
The strategy in this scenario, is to paginate the data. Query only small chunks of data, and when needed, request more data.
StepZen automatically creates paginated queries for all the List queries.
Let’s use a paginated query on our home feed.
const postListPaginated = gql`query postListPaginated($first: Int, $after: Int) {postPaginatedList(first: $first, after: $after) {idimagecontentprofile {imageidnameposition}}}`;
For the useQuery hook, we can also send the variable to specify how many items we want to load first.
const { loading, error, data, fetchMore } = useQuery(postPaginatedList, {variables: { first: 2 },});
The useQuery hook, also gives us a fetchMore function. We can use it to fetch the next page.
Let’s use the callback function onEndReached from the flatlist, to fetch more posts.
<FlatList...onEndReached={() =>fetchMore({ variables: { after: data.postPaginatedList.length } })}/>
This is the first part. The pagination will not work properly yet, because Apollo doesn’t know how to merge 2 pages together. For that, we have to define a typePolicy inside our apollo/Client.tsx
const typePolicies: TypePolicies = {Query: {fields: {postPaginatedList: {keyArgs: false,merge(existing = [], incoming) {return [...existing, ...incoming];},},},},};//Provide it to InMemoryCachenew InMemoryCache({ typePolicies })
Authentication
At this moment, anyone can access our application.
Let’s add an authentication flow so that users can create accounts and sign in.
We will use clerk.com for this.
Let’s follow this guide to add the Sign In and Sign Up screens: https://clerk.com/docs/quickstarts/get-started-with-expo
After the user creates a new account, we have to also add an onboarding step where he can set up his profile. We have to save a new row inside the Profile table.
Conclusions
I hope you enjoyed this tutorial so far.
I encourage you to not stop here. Try to add additional features that might interest you. That’s the best way to learn.
Check other episodes from the Build Your Own Full-stack LinkedIn Clone series