
Introduction
Exciting news in the world of React Native Animation: The Skia team recently published React Native Skia version 1.0, a significant milestone achieved just 3 weeks ago. In this first-ever stable release, they’ve unveiled 5 super exciting features and enhancements.
- Rich Text Layouts using the New Paragraph API
- New Animation Hooks
- The Atlas API for rendering multiple instances of the same texture or image
- Efficient Lottie Animations with RN Skottie and RN Skia
- Canvaskit-js - 20kb RN Skia for web
Let’s explore these features individually, create code examples, and showcase their functionality along with the expected output, as demonstrated below.

Before diving into the details of each feature & enhancement, let’s understand some basics about Skia & React Native Skia.
The Skia Library
Skia is an open-source 2D graphics library that provides common APIs that work across a variety of hardware and software platforms. It serves as the graphics engine for Google Chrome and ChromeOS, Android, Flutter, and many other products.
Skia is now in React Native
React Native Skia brings the Skia Graphics Library to React Native. It has been built by the Shopify team and William Candillon, on top of the Skia Library.
One of the main differences between Flutter & React Native is that, Flutter has control over pixels but the big downside is Flutter doesn’t have control over Native Views. On the other hand, React Native has control over Native Views but it loses control over Pixel.
What "React Native Skia" did here is that it gives React Native control over Pixels too now. Besides this, by "React Native Skia" you can apply effects on Native Views and capture the pixels of Native views too.
Unveiling the Potency of React Native Skia
There is tremendous potential in React Native Skia. Let’s explore some common but very crucial capabilities of React Native Skia.
- "React Native Skia" is using JSI. JSI (Javascript Interface) is written in C++ & it is the new architecture model in React Native which dropped the old "Bridge" architecture from React Native. JSI brought a direct, native interface to JavaScript objects and functions. As "React Native Skia" uses JSI it can expose C++ objects to Javascript & which makes React Native Skia very faster.
- "React Native Skia" also uses "Reanimated", which was created by Software Mansion. "Reanimated" enables developers to create smooth animations and interactions that run natively on the UI thread. In React Native, there are two threads specifically used: 1) JS thread and 2) UI (Native) thread. When animations can run on the UI thread, they become very speedy due to native performance. Since "Reanimated" can run animations on the UI thread and "React Native Skia" uses Reanimated, so "React Native Skia" can run animations on the UI (Native) thread which makes it super fast.
Install React Native Skia
To add React Native Skia to your project, simply run:
npm install @shopify/react-native-skia
Let’s dive into new features & enhancements
Rich Text Layouts with the New Paragraph API
From day one, React Native Skia was able to display text, but it was not possible to automatically break lines, apply layouts, or mix and match system fonts with custom app fonts. And this is what the Paragraph API now does.
The Paragraph API in React Native Skia allows you to create sophisticated text layouts with ease. Whether you’re building a chat app, a document viewer, or any other text-heavy interface, this feature will come in handy.
Let’s start by creating the below paragraph using custom fonts.

To do this you have to add one or two custom fonts in your React Native app. For your information, we will use "Roboto" & "BungeeSpice" fonts for this example.
First of all, let’s import dependencies from RN Skia SDK.
// Importsimport {Paragraph,Skia,useFonts,TextAlign,Canvas,} from "@shopify/react-native-skia";
Now load your custom fonts.
// imports ...// Build a component to render paragraph with custom fontsexport default function RichText() {// Load custom fontsconst customFontMgr = useFonts({Roboto: [require("../../assets/fonts/roboto/Roboto-Regular.ttf"),require("../../assets/fonts/roboto/Roboto-Medium.ttf"),],Bungee: [require("../../assets/fonts/bungee/BungeeSpice-Regular.ttf")],});}
Then build the paragraph using "Skia.ParagraphBuilder" with the above custom fonts that we loaded.
// Imports ...// Build a component to render paragraph with custom fontsexport default function RichText() {// Load custom fonts ...// Build paragraphreturn Skia.ParagraphBuilder.Make(paragraphStyle, customFontMgr).pushStyle(textStyle).addText("Welcome to RN").pushStyle({ ...textStyle, fontStyle: { weight: 500 } }).addText(" Skia V1.0. 🚀").pushStyle({ ...textStyleBungee }).addText(" #NotJustDev").pushStyle({ ...textStyle }).addText(" is presenting ").pushStyle({ ...textStyle, fontStyle: { weight: 500 } }).addText("Skia.").pop().build();}
You see we added styles "paragraphStyle", "textStyle" & "textStyleBungee". Now let’s see how we added those styles inside RichText the component.
// Imports ...// Build a component to render paragraph with custom fontsexport default function RichText() {// Load custom fonts ...// Define stylesconst paragraphStyle = {textAlign: TextAlign.Center,};const textStyle = {color: Skia.Color("black"),fontFamilies: ["Roboto"],fontSize: 50,};const textStyleBungee = {color: Skia.Color("black"),fontFamilies: ["Bungee"],fontSize: 45,};// Build paragraph ...}
Finally return the Paragraph we built using custom fonts
// Imports ...// Build a component to render paragraph with custom fontsexport default function RichText() {// Load custom fonts ...// Define styles ...// Build paragraph ...// Render the paragraphreturn (<Canvas style={{ width: 256, height: 256 }} ><Paragraph paragraph={paragraph} x={0} y={0} width={wp(90)} /></Canvas>);}
Now call this <RichText /> component from anywhere in the app. You will see an output like below.

Let’s get a review of other new features & enhancements of React Native Skia V1.0.
New Animation Hooks
These hooks provide the easiest and fastest way to build animations in Skia. Below are animation hooks that RN SKIA provided when using React Native Skia with Reanimated.
- usePathInterpolation: This hook smoothly interpolates between different path values based on a progress value. Imagine you have two different shapes (paths), and you want to transition smoothly from one to the other. usePathInterpolation makes this happen seamlessly.
- usePathValue: This hook offers an easy way to animate paths. Behind the scenes, it optimizes everything for efficiency. Imagine you’re creating a weather app, and you want to animate a raindrop falling from the sky. usePathValue ensures that raindrop glides down gracefully, without any hiccups.
- useClock: This hook returns a time value in milliseconds since it was activated. Let’s think of it as a digital stopwatch that starts ticking when your component mounts. You can use this time value for various purposes, such as creating time-based animations or scheduling events.
- useRectBuffer: This hook creates an array of rectangles to be animated. If your component needs to handle multiple rectangles (maybe for a game grid or UI layout), useRectBuffer simplifies the process. It’s like having a stack of virtual sticky notes you can move around.
The Atlas API
The Atlas component in React Native Skia is like a magical backpack for textures or images. It helps you efficiently render multiple instances of the same texture (think: sprites) with varying transformations.
Imagine you’re drawing a bunch of similar objects, like game characters or UI elements, and you want them to move, rotate, or scale smoothly. The Atlas API has your back!
The Atlas component has 3 major attributes.
- Image: You load an image (your texture) into the Atlas. This could be anything — a cute cat, a spaceship, or even a slice of pizza (because why not? 🍕).
- Sprites: Next, you define where these sprites (pieces of your image) are located within the Atlas. Each sprite corresponds to a specific part of your texture.
- Transforms: You apply transformations (like rotation, scaling, or translation) to each sprite. These transformations make your sprites dance, fly, or do whatever you need them to do.
Let’s create an Atlas component like below & understand each of its parts.
First of all, import all the dependencies.
// Importsimport React from "react";import {Skia,drawAsImage,Group,Rect,Canvas,Atlas,rect,} from "@shopify/react-native-skia";
Now, we’re creating an image (a rectangle shape) that contains two rectangles by using <Rect /> — one cyan-filled and the other blue-bordered.
// Imports....// Create an Image (Rectangle shape)const size = { width: 25, height: 11.25 };const strokeWidth = 2;const imageSize = {width: size.width + strokeWidth,height: size.height + strokeWidth,};const image = drawAsImage(<Group><Rectrect={rect(strokeWidth / 2, strokeWidth / 2, size.width, size.height)}color="cyan"/><Rectrect={rect(strokeWidth / 2, strokeWidth / 2, size.width, size.height)}color="blue"style="stroke"strokeWidth={strokeWidth}/></Group>,imageSize);
Then below, we’re creating an array called sprites. The array will have numberOfBoxes elements (in this case, 350). Each element represents a sprite, which is like a cutout from our image (those rectangles or circles we want to animate). The rect(0, 0, imageSize.width, imageSize.height) function creates a sprite with a specific size (width and height).
// Imports....// Create an Image (Rectangle shape)....// Create the <ImageWithAtlas /> component to render Atlas Imagesexport default ImageWithAtlas = () => {// Create 350 sprites (350 Rectangles)const numberOfBoxes = 350;const sprites = new Array(numberOfBoxes).fill(0).map(() => rect(0, 0, imageSize.width, imageSize.height));};
After that, now we’re creating another array called transforms. Each element in this array represents a transformation for a corresponding sprite.
// Imports....// Create an Image (Rectangle shape)....// Create the <ImageWithAtlas /> component to render Atlas Imagesexport default ImageWithAtlas = () => {// Create 350 sprites (350 Rectangles)....// Create transformation rules for each spritesconst pos = { x: 190, y: 258 };const width = 400;const transforms = new Array(numberOfBoxes).fill(0).map((_, i) => {const tx = 5 + ((i * size.width) % width);const ty = 25 + Math.floor(i / (width / size.width)) * size.width;const r = Math.atan2(pos.y - ty, pos.x - tx);return Skia.RSXform(Math.cos(r), Math.sin(r), tx, ty);});};
In the above transformation code, we used some calculations. Let’s try to understand them a bit.
- The pos is the center point, and sprites (rectangles) will circulate this center point.
- The tx and ty values determine the position (translation) of each sprite (each rectangle in this case).
- The r value calculates the rotation angle based on the sprite’s position relative to the center point (pos).
Now bringing It all together through <Atlas /> API.
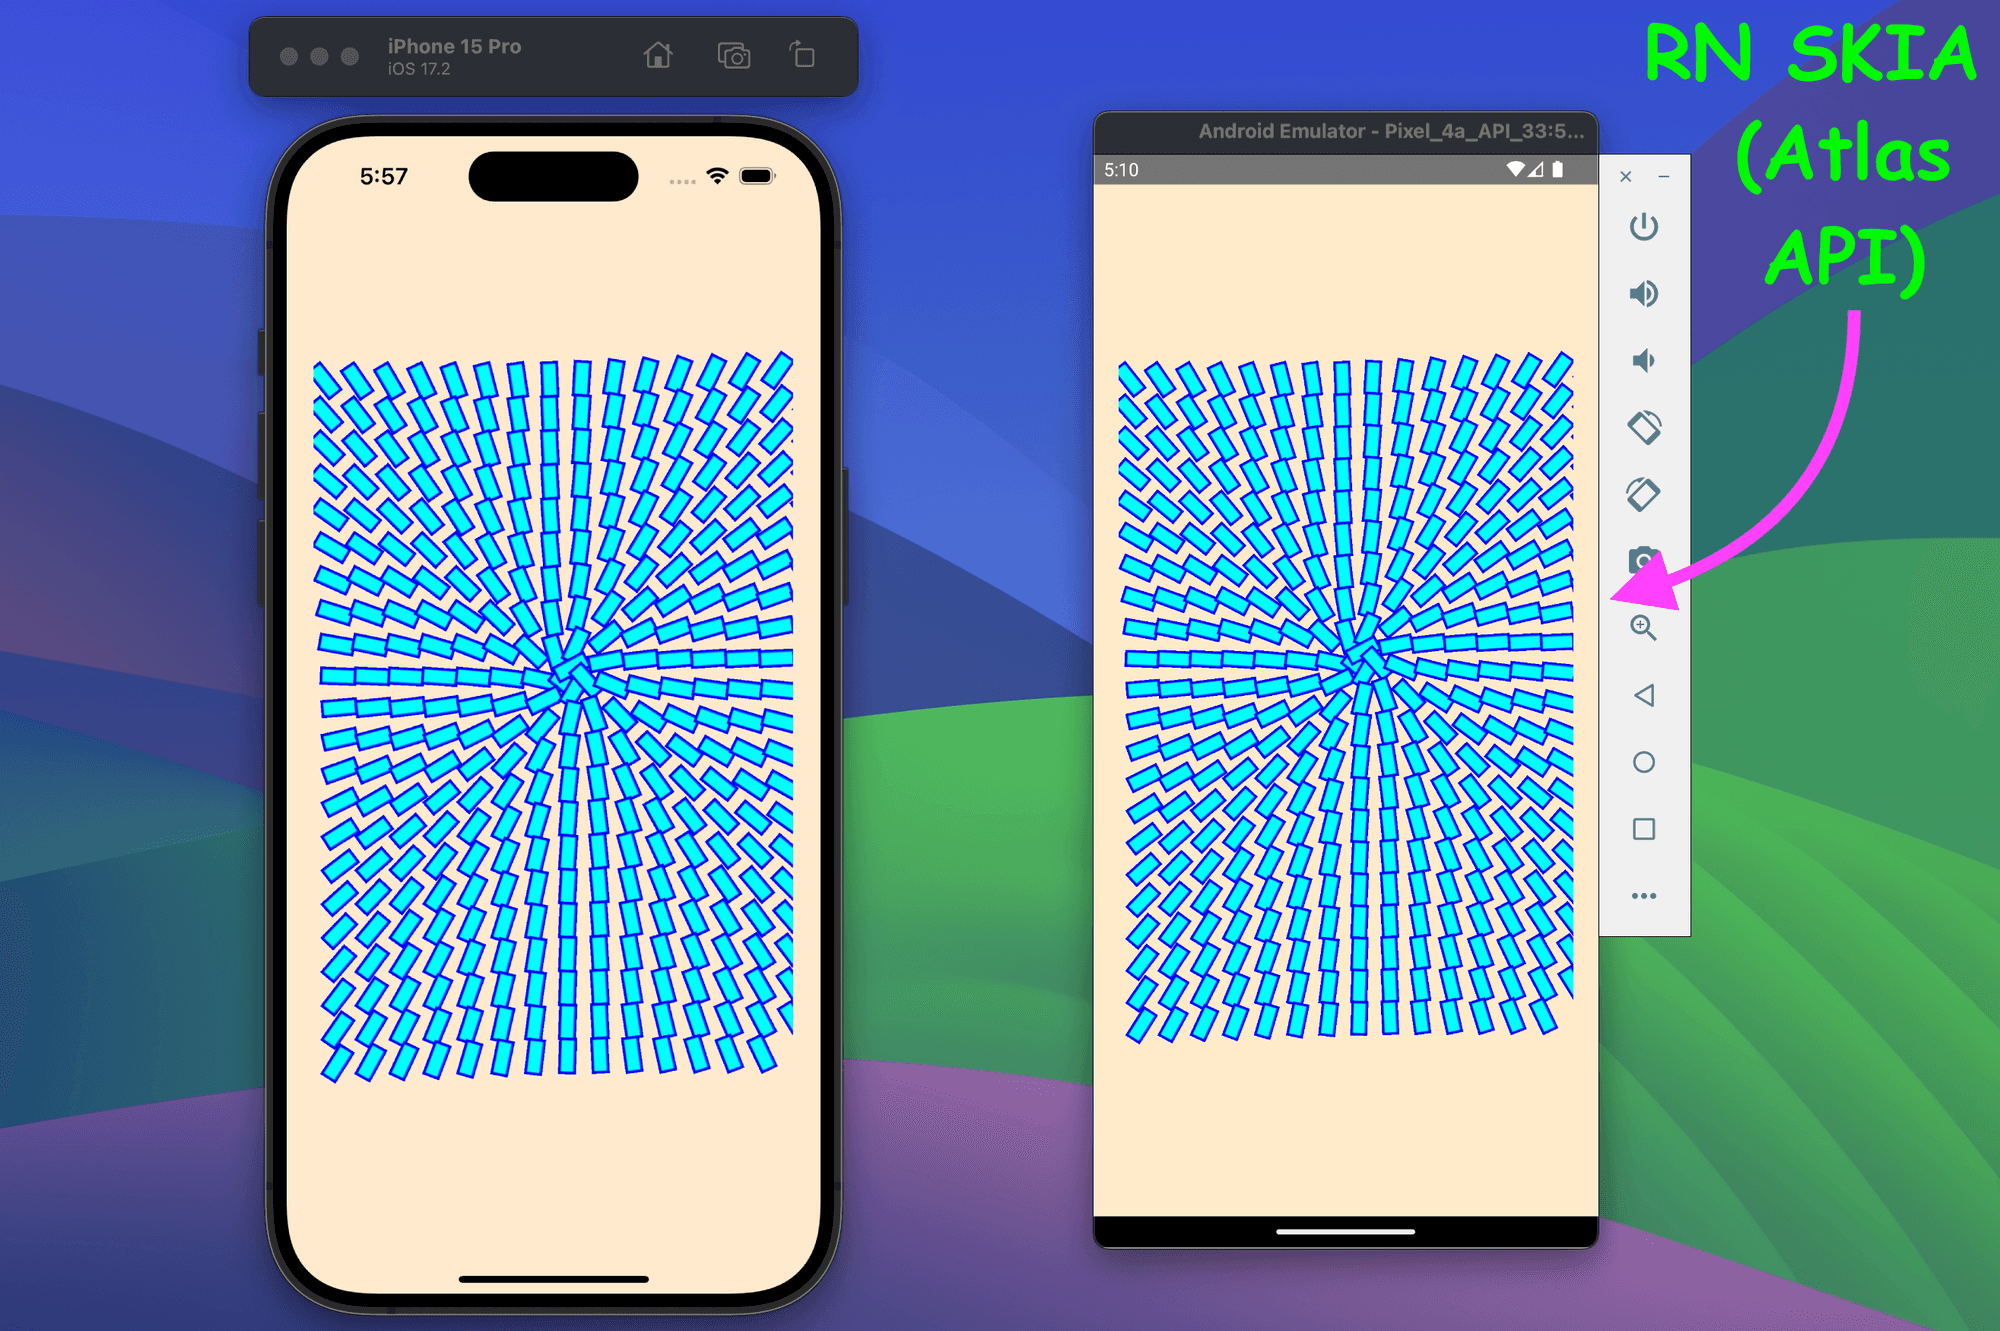
// Imports....// Create an Image (Rectangle shape)....// Create the <ImageWithAtlas /> component to render Atlas Imagesexport default ImageWithAtlas = () => {// Create 350 sprites (350 Rectangles)....// Create transformation rules for each sprites....// Finally create & return the Atlas component to render 350 spritesreturn (<Canvasstyle={{width: wp(100),height: hp(60),}}><Atlas image={image} sprites={sprites} transforms={transforms} /></Canvas>);};
Now you can call the <ImageWithAtlas /> component from anywhere in your app & you will see an output like below.

Efficient Lottie Animations with RN Skottie and RN Skia
For scripted (Guided Movements) animations, React Native Skia serves as the foundation for React Native Skottie by providing the necessary infrastructure for rendering graphics. React Native Skottie has been created by Margelo.
When you use react-native-skottie in your React Native app, it internally relies on @shopify/react-native-skia. When you load a Lottie animation (either from a JSON file or a DotLottie file), @shopify/react-native-skia processes it and hands it over to Skottie. Skottie then takes care of rendering the animation efficiently using Skia’s GPU acceleration. The result is incredibly smooth and performant animations within your React Native app!
It is very simple to use Skottie in your React Native App.
// Importsimport { Skottie } from "react-native-skottie";import LottieAnimationFile from "./animation.json";// Return the component to render with Skottie animationexport default function App() {return (<Skottiestyle={styles.flex1}source={LottieAnimationFile}autoPlay={true}/>);}
Canvaskit-js: Skia in Web
The React Native Skia team is excited to announce the release of Canvaskit-js, an open-source library designed for web development. This lightweight yet powerful library enables you to create rich web experiences using React Native Skia, all while keeping your bundle size impressively small — just 20 kilobytes!
That’s it 🙌
In a nutshell, React Native Skia V1.0 brings five fresh features to the table. Get ready for an exciting ride!