
Introduction
Let’s dive deep into the world of macOS app development using React Native, uncovering its possibilities and limitations, by building a real application that you can run natively on MacOS.
This post is meant to be used alongside our video tutorial:
Grab a ☕ and let’s get started
Resources
Setup a new React Native project for MacOS
Initialize a new React Native project using version 0.71. This is the latest supported version for React Native macOS as of writing this tutorial.
npx react-native init MacOSApp --version '^0.71.0'
Initialize the React Native macOS package
npx react-native-macos-init
Run the app on macOS
npx react-native run-macos
Clean the App.tsx file and prepare it for the next step.
Troubleshoot
If npx react-native init command fails at the bundler step, try this
cd iosbundle installbundle exec pod install
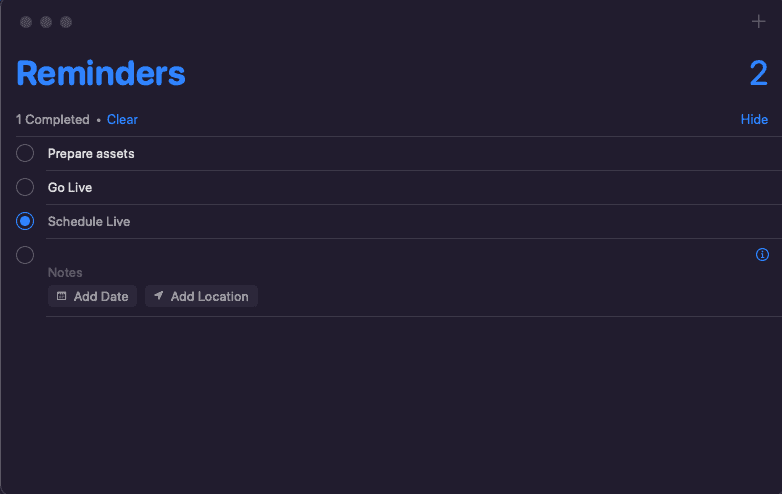
macOS Reminders app with React Native
The native Reminders app on macOS is a great example to build for this demo. This app works both on iOS mobile devices and also natively on macOS.
Render one reminder line
Let’s start with the simplest element on the screen - the reminder line. This element is made of a radio button on the left and a text box on the right.
For the radio button, let’s use React Native Paper. Let’s install it based on their Getting Started docs.
npm install react-native-paper
Now, let’s put them together and render the reminder item
<View style={styles.container}><View style={styles.item}><RadioButtonvalue={'Subscribe to notJust.dev'}status={'unchecked'}color="royalblue"/><Text style={styles.itemTitle}>Subscribe to notJust.dev</Text></View></View>
And style it:
const styles = StyleSheet.create({container: {padding: 10,flex: 1,backgroundColor: '#211D2D',},item: {flexDirection: 'row',alignItems: 'center',borderBottomWidth: StyleSheet.hairlineWidth,borderColor: '#454547',paddingVertical: 5,},itemTitle: {flex: 1,marginLeft: 5,},});
Render the list of reminders
Now that we can render one reminder, let’s put it together and render a list of all reminders.
For that, move the item view container to a separate renderItem function
const renderItem = ({item, index}: {item: Reminder; index: number}) => (<View style={styles.item}><RadioButtonvalue={item.title}status={item.completed ? 'checked' : 'unchecked'}color="royalblue"/><Text style={styles.itemTitle}>{item.title}</Text></View>);
Add a state variable that will store all our reminders
type Reminder = {title: string;completed: boolean;};const defaultReminders: Reminder[] = [{title: 'Subscribe to notJust.dev',completed: false,},{title: 'Build exciting apps',completed: false,},{title: 'Be happy',completed: false,},];function App(): JSX.Element {const [reminders, setReminders] = useState<Reminder[]>(defaultReminders);...}
Now, we have to render all the reminders from the state using a FlatList
<FlatList data={reminders} renderItem={renderItem} />
Complete a task
When we press on an item, we have to call a function. Replace the <View> with a <TouchableOpacity> inside the renderItem function.
<TouchableOpacityonPress={() => toggleCompletion(index)}style={styles.item}>...</TouchableOpacity>
Implement the toggleCompletion function
const toggleCompletion = (index: number) => {const updatedReminders = [...reminders];updatedReminders[index].completed = !updatedReminders[index].completed;setReminders(updatedReminders);};
Add a reminder
Firstly, we will need a new state variable to keep track of the new reminder
const [newReminder, setNewReminder] = useState('');
Now let’s add a <TextInput /> component after the FlatList.
<TextInputstyle={styles.input}onChangeText={setNewReminder}value={newReminder}placeholder="Add a new reminder"onSubmitEditing={addReminder}/>
Lastly, implement the addReminder function
const addReminder = () => {if (newReminder.trim() !== '') {const updatedReminders = [...reminders,{title: newReminder, completed: false},];setReminders(updatedReminders);setNewReminder('');}};
Page title
At the top of the page, let’s render the title and the number of reminders.
<View style={{flexDirection: 'row', justifyContent: 'space-between'}}><Text style={styles.title}>Reminders</Text><Text style={styles.title}>{reminders.length}</Text></View>
And style it:
title: {fontSize: 32,fontWeight: 'bold',color: 'royalblue',},
Conclusion
That’s it! You have built a native macOS App with React Native.
I hope this project will open the doors for you to new opportunities.
Keep learning, experimenting, and having fun 🥳