
Introduction
Have you ever seen those mindblowing 3D websites and wondered how they were build?
Most of them are built with the help of Three.js, which is a javascript library used to render 3d graphics using WebGL.
Three.js is also compatible with React Native, and in this tutorial you learn the fundamentals of Three.js by building an exciting 3d animations for the Nike app.
Follow the video version of this totorial on youtube:
Let’s build our first 3d scene
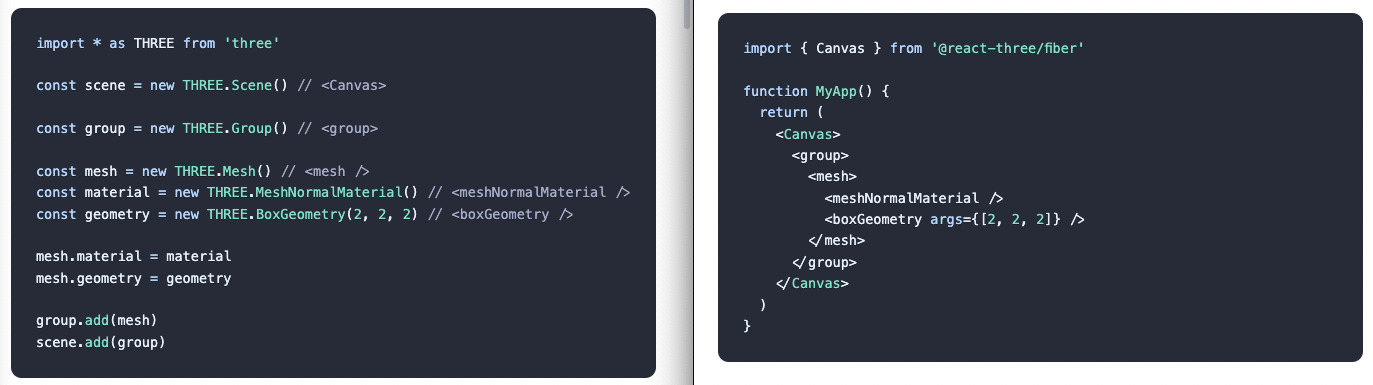
We are going to use React Three Fiber, which is a React renderer for three.js. That means that we are going to write code the React way, what we are used to such as reusable components that react to state.
The difference in code can be seen in the bellow example (on the left we have threejs code and on the right the equivalent in React Three Fiber).
Setup an Expo project
Let’s get started by creating a blank expo project
npx create-expo-app FirstThreeApp
Open the project in your editor of choice. In my case that’s VScode.
Also, let’s go ahead and run our project using npm start and then scanning the QR with our phone using the Expo Go app.
Install dependencies
Now, let’s install three, @react-three/fiber and expo-gl. Make sure your terminal is in the root folder of your newly created project.
npx expo install three @react-three/fiber expo-gl expo-three expo-file-system
Three.js fundamentals
Canvas
The canvas is the component where our scene will be rendered in. Start by rendering Canvas as the root component of our app.
import { Canvas } from '@react-three/fiber';export default function App() {return <Canvas></Canvas>;}
Render an object
To render something on the screen, we need to know its shape (or geometry), for example the shape of a ball is a sphere.
Besides the shape, we also need to know what material it is made off: for example a basketball ball is made of rubber and it’s color is orange.
The Geometry and the Material are the components of a Mesh.
Let’s render a basketball
<mesh><sphereGeometry /><meshStandardMaterial color="orange" /></mesh>
Play with the position of the mesh on the screen, and with different geometries to see how it works.
Check out different geometries on threejs docs.
The problem is that we don’t really see the color orange that we wanted our ball to be.
Why?
Because we forget to turn on the lights.
Lighting
Let’s add an ambientLight source that is similar to the daylight in a room. This type of light will light all the sides of the object in the same way and will not produce shadows
<ambientLight />
A <pointLight> on the other hands, is similar to a light bulb that will light more the part of the object that faces the light source. Bcause of that, a pointLight also needs a position in space.
<pointLight position={[10, 10, 10]} />
Reusable components
The benefit of React Three Fiber is that we can build our scenes from reusable 3d react components.
Let’s create a resuable Box component
function Box(props) {return (<mesh {...props}><boxGeometry args={[1, 1, 1]} /><meshStandardMaterial color={'orange'} /></mesh>);}
Now, we can render multiple boxes by simply rendering the <Box /> component
<Box position={[0, -1.2, 0]} /><Box position={[0, 1.2, 0]} />
We can then use state variables to manage the state of each Box
const [active, setActive] = useState(false);<mesh{...props}onClick={(event) => setActive(!active)}scale={active ? 1.5 : 1}>
Animating the object
We can use the hook useFramewhich allows us to execute code on every rendered frame.
We will use it to rotate the boxes
const mesh = useRef();useFrame((state, delta) => (mesh.current.rotation.y += delta));<meshref={mesh}...
Rendering 3d models
Now that we coverd the fundamentals, let’s start working on the real use case of displaying a 3d model of a shoes.
Let’s first drag-and-drop the Airmax folder from the asset bundle into the assets directory of our project.
We have to configure metro bundler to include these files as assets. For that update (or create) the file metro.config.js
// metro.config.jsmodule.exports = {resolver: {sourceExts: ['js', 'jsx', 'json', 'ts', 'tsx', 'cjs'],assetExts: ['glb', 'gltf', 'mtl', 'obj', 'png', 'jpg'],},}
Now we have to restart our server and clean the cache.
npm start -- --clear
Create the Shoe component
function Shoe(props) {return <mesh></mesh>;}
Load the object
import { Canvas, useFrame, useLoader } from '@react-three/fiber';import { OBJLoader } from 'three/examples/jsm/loaders/OBJLoader';...const obj = useLoader(OBJLoader,require('./assets/Airmax/shoe.obj'));
And render the object using the primitive component
<primitive object={obj} scale={10} />
At this point, we should get an error saying "A component suspended … ". To fix this, we need to wrap our <Shoe /> component inside a <Suspsense /> to render a fallback component while the shoe componen is loading the necessery assets.
At this point we should see the shape of the shoe. That’s perfect.
Let’s load the Materials
Let’s load the textures and the materials of our shoe.
import { MTLLoader } from 'three/examples/jsm/loaders/MTLLoader';const material = useLoader(MTLLoader, require('./assets/Airmax/shoe.mtl'));const obj = useLoader(OBJLoader,require('./assets/Airmax/shoe.obj'),(loader) => {material.preload();loader.setMaterials(material);});
Textures
import { TextureLoader } from 'expo-three';const [base, normal, rough] = useLoader(TextureLoader, [require('./assets/Airmax/textures/BaseColor.jpg'),require('./assets/Airmax/textures/Normal.jpg'),require('./assets/Airmax/textures/Roughness.png'),]);useLayoutEffect(() => {obj.traverse((child) => {if (child instanceof THREE.Mesh) {child.material.map = base;child.material.normalMap = normal;child.material.roughnessMap = rough;}});}, [obj]);
- map is our color map. This defines what color does our object have
- normalMap specifies the textures of our material. This changes the way each part of the shoes color is lit.
- roughnessMap specifies how rought the material appears from mirror like material that reflects lights, to a diffues material that does not reflect light.
Let’s animate the shoe
In this part of the of tutorial, we will hook the 3d model up to the gyroscop sensor and will drive some animations based on this. This will give it a sense that by moving your phone in your hand, you can move the shoe on the screen.
Install Reanimated
Let’s install Reanimated library that will power our sensor based animation.
npx expo install react-native-reanimated
Add the babel plugin inside babel.config.js and then restart the server
plugins: ['react-native-reanimated/plugin'],
Now, let’s use the Animated Sensor and send it’s date to our 3d Model Shoe
import { useAnimatedSensor, SensorType } from 'react-native-reanimated';const animatedSensor = useAnimatedSensor(SensorType.GYROSCOPE, {interval: 100,});<Shoe animatedSensor={animatedSensor} />
And in the useFrame of our Shoe, wqe can use the data from the sensor to animate to rotation of the shoe
useFrame((state, delta) => {let { x, y, z } = props.animatedSensor.sensor.value;x = ~~(x * 100) / 5000;y = ~~(y * 100) / 5000;mesh.current.rotation.x += x;mesh.current.rotation.y += y;});
Now, moving the phone will drive the animation of the shoe.
Conclusion
I hope you enjoyed this tutorial as much as I enjoyed putting it together.