
Introduction
We all love traveling, but more than traveling we love cheap flight tickets.
There are a lot of airlines, with different price policies, and trying to find the best deal yourself feels like looking for a needle in a haystack. That’s why price comparison apps like Skyscanner, Kayak, Kiwi, and Google Flights exist. They scrape the internet for all the deals and show you the best ones saving you countless hours.
That’s what we will build today: A flight price comparison mobile app that will scan the internet for the best deals and show them to the user.
We will use React Native and Expo for the mobile app and BrightData to easily scrape the web for flight price data from various sources.
Video tutorial
This guide was designed to be used together with the video tutorial. Open it in a new tab, and let’s get started.
Asset Bundle
The Asset bundle contains all the required assets to help you follow along.
Download Asset BundleUI with React Native
Initialize the Expo project
Let’s start by creating a new React Native application using Expo.
npx create-expo-app@latest FlightPriceTracking
After the project is initialized, let’s open it up in our editor of choice.
Open a terminal, and start the development server with npm start
The next step is to run our app on a device. The easiest way is to download the Expo Go app (available both on Play Market and App Store), and then scan the QR you see in the terminal. That way, you can continue to develop the app and see the hot updates directly on your device.
Optionally, you can run the app on an iOS Simulator by pressing i or on Android Emulator by pressing a. But for this, you have to set up the emulators using Xcode and/or Android Studio.
Search form
Let’s start by rendering the Search form. It will include 4 fields:
- The airport from
- The airport to
- Departure date
- Return date
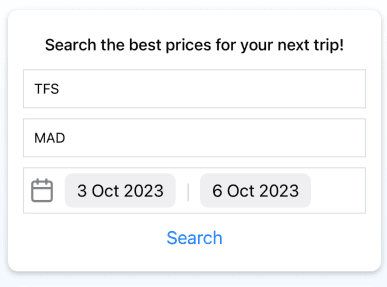
Let’s create this form as separate component components/SearchForm.js. We will start with the first 2 input fields for the form and to airport values.
import { useState } from 'react';import { StyleSheet, Text, View, TextInput, Button } from 'react-native';export default function SearchForm({ onSearch }) {const [from, setFrom] = useState('');const [to, setTo] = useState('');const onSearchPress = async () => {onSearch({ from, to });};return (<View style={styles.card}><Text style={styles.title}>Search the best prices for your next trip!</Text><TextInputplaceholder="From"value={from}onChangeText={setFrom}style={styles.input}/><TextInputplaceholder="To"value={to}onChangeText={setTo}style={styles.input}/><Button title="Search" onPress={onSearchPress} /></View>);}const styles = StyleSheet.create({container: {flex: 1,},card: {backgroundColor: 'white',borderRadius: 10,padding: 15,margin: 10,// shadowsshadowColor: '#000',shadowOffset: {width: 0,height: 2,},shadowOpacity: 0.23,shadowRadius: 2.62,elevation: 4,},title: {fontSize: 16,fontWeight: '500',marginVertical: 10,alignSelf: 'center',},input: {borderWidth: 1,borderColor: 'gainsboro',marginVertical: 5,padding: 10,},});
Import this component in the App.js and render it on the screen
import SearchForm from './components/SearchForm';const onSearch = async (data) => {console.log(data);}<SearchForm onSearch={onSearch} />
Date inputs
For the departure and return dates, we will use the @react-native-community/datetimepicker.
Let’s install it with:api
npx expo install @react-native-community/datetimepicker
Define the state variables for these dates:
const [departDate, setDepartDate] = useState(new Date());const [returnDate, setReturnDate] = useState(new Date());
And render the Date pickers below the existing fields:
// importimport DateTimePicker from '@react-native-community/datetimepicker';import { Feather } from '@expo/vector-icons';...// render inside return ()<View style={styles.datePicker}><Feather name="calendar" size={26} color="gray" /><DateTimePickervalue={departDate}minimumDate={new Date()}onChange={(event, date) =>setDepartDate(date || new Date())}/><Textstyle={{ marginLeft: 10, color: 'gainsboro', fontSize: 20 }}>|</Text><DateTimePickervalue={returnDate}minimumDate={departDate}onChange={(event, date) =>setReturnDate(date || new Date())}/></View>...// styledatePicker: {flexDirection: 'row',alignItems: 'center',borderWidth: 1,borderColor: 'gainsboro',marginVertical: 5,padding: 5,},
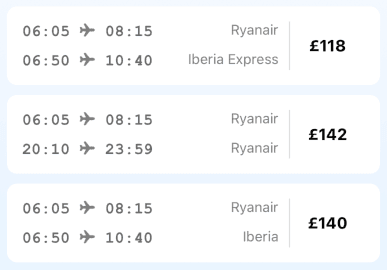
Flight prices list
After we search, we will render a list of options, with different prices from the sources we will scrape a bit later.
Before we implement the actual scraping, let’s use a JSON file that I have prepared and use it as an example of a scrape result to render the list of options.
Add the data.json file from the Asset Bundle in the root folder of your project and import it inside the App.json. The data.json file contains an array of items. Let’s first try to render one item from the list.
Create a new component inside components/FlightOptionItem.js and render the flight data. It should display 2 lines for the departure and return flights, with their times and the Airline, and on the right, the total price of this option.
import { View, Text, StyleSheet } from 'react-native';import { Ionicons } from '@expo/vector-icons';const FlightOptionItem = ({ flight }) => {return (<View style={styles.container}><View style={styles.routes}><View style={styles.route}><Text style={styles.time}>{flight.from.departAt}{' '}<Ionicons name="airplane" size={16} color="gray" />{' '}{flight.from.arriveAt}</Text><Text style={styles.airline}>{flight.from.airline}</Text></View><View style={styles.route}><Text style={styles.time}>{flight.to.departAt}{' '}<Ionicons name="airplane" size={16} color="gray" />{' '}{flight.to.arriveAt}</Text><Text style={styles.airline}>{flight.to.airline}</Text></View></View><Text style={styles.price}>{flight.price}</Text></View>);};const styles = StyleSheet.create({container: {flexDirection: 'row',alignItems: 'center',backgroundColor: 'white',marginVertical: 5,marginHorizontal: 10,padding: 15,borderRadius: 10,},routes: {flex: 1,borderRightWidth: 1,borderColor: 'gainsboro',gap: 10,paddingRight: 10,},route: {flexDirection: 'row',justifyContent: 'space-between',},time: {fontWeight: 'bold',fontSize: 16,color: 'dimgray',fontFamily: 'Courier New',},airline: {color: 'gray',},price: {width: 75,textAlign: 'center',fontWeight: 'bold',fontSize: 16,},});export default FlightOptionItem;
From App.js we can import this component, and send one item from our array of flights to it.
<FlightOptionItem flight={data[0]} />
If we see the item rendered below the form, we can move on.
FlatList of flight options
Now that we can render one item, we can use a FlatList component to render a scrollable list of items.
<FlatListdata={data}renderItem={({ item }) => <FlightOptionItem flight={item} />}showsVerticalScrollIndicator={false}/>
Now, all items from the dummy data are rendered on the screen and we can scroll through them.
Next steps
Congrats on reaching the tutorial so far. We are making great progress, and our mobile app is almost ready. The next step is to get actual price data to display in our app. That’s what we will focus on, in the next part.
¡Vamos! 🙌
Data Scraping with BrightData
The concept of our application depends on data from different sources. These can be airline websites or other price aggregators like Skyscanner, Kayak, Kiwi, etc. However, these websites usually don’t offer any API that we can easily query. So, the challenge is how to get this data.
That’s where WEB Scraping comes into play. We can write a script, that will load the target websites, search for the flights we are interested in, and parse the results page extracting the data we need.
WEB Scraping is a huge topic because it unlocks access to data that otherwise would not be available.
For the same reason, big companies implement specific tricks to make scraping harder. They track your activity and if they find it suspicious can block your IP. That’s one of the biggest challenges in scraping data at scale.
That’s where BrightData can help us. With Bright Data’s Scraping Browser we can run our web scrapper at scale on top of a full proxy and unblocking infrastructure. This way, we can focus on how we want to get data and let BrightData take care of all the challenging aspects of unblocking the web.
Create an account
We have partnered with BrightData for this tutorial, and all notJust Developers get $15 credits when signing up using our link: https://brdta.com/notjustdev
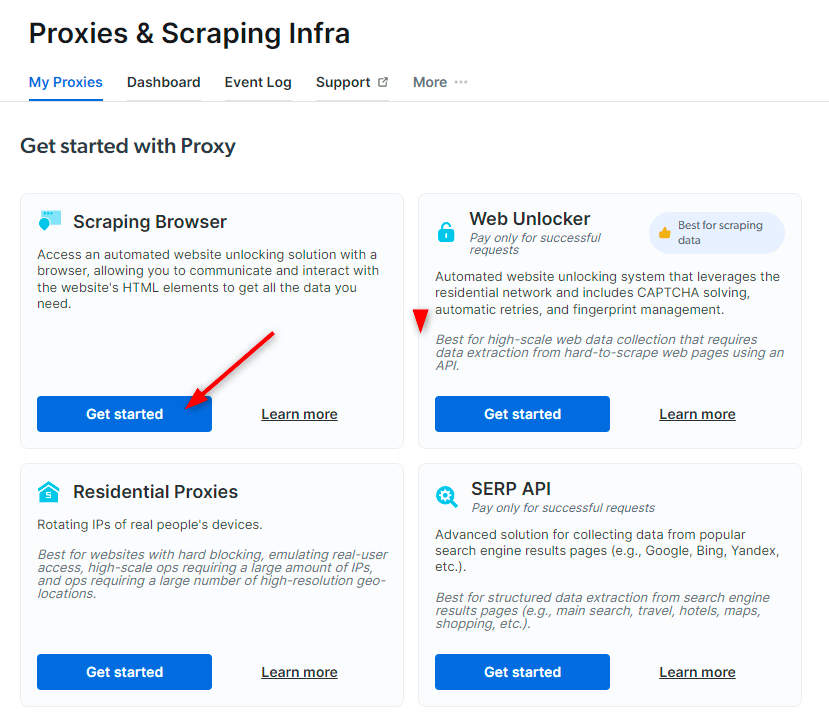
Sign up and get $15 creditsCreate a new Scraping Browser
From the side menu, go to Proxies & Scraping Infrastructure and press Get Started under Scraping Browser. Give it a name and press Add proxy.
On the Scraping Browser page, we can see our credentials inside the Access parameters tab. They will help us connect to our Scraping Browser using Puppeteer - a browsing library.
Let’s write our scraper
We will write our scraper in NodeJS. Let’s initialize our NodeJS app in a new folder.
mkdir FlightPriceTrackerBackendcd FlightPriceTrackerBackendnpm init -y
Now, we can open this folder in VSCode. It’s an empty project yet.
Back on the Bright Data dashboard on the Scraping Browser page, from the right menu, click Check out code and integration examples. Let’s choose NodeJS and Puppeteer. Let’s follow the steps for the Getting started template.
npm install puppeteer-core
And then, copy and paste the code inside a new scraper.js file
const puppeteer = require('puppeteer-core');const SBR_WS_ENDPOINT = 'wss://YOUR_BROWSER_USERNAME:YOUR_BROWSER_PASS@brd.superproxy.io:9222';async function main() {console.log('Connecting to Scraping Browser...');const browser = await puppeteer.connect({browserWSEndpoint: SBR_WS_ENDPOINT,});try {const page = await browser.newPage();console.log('Connected! Navigating to https://example.com...');await page.goto('https://example.com');console.log('Navigated! Scraping page content...');const html = await page.content();console.log(html)} finally {await browser.close();}}main().catch(err => {console.error(err.stack || err);process.exit(1);});
To execute the script, run
node scraper
Debugging with Chrome dev tools
Puppeteer is connecting to a browser that runs on BrightData’s servers (not on your local machine). If we want to see what’s happening behind the scenes, we can use Chrome dev tools and connect to the browser to have a real-time view of what our scraper is doing. This is crucial for debugging.
Let’s create a utils.js file and add this code that will launch Chrome dev tools
const { exec } = require('child_process');const chromeExecutable = 'google-chrome';const delay = (ms) => new Promise((resolve) => setTimeout(resolve, ms));const openDevtools = async (page, client) => {// get current frameIdconst frameId = page.mainFrame()._id;// get URL for devtools from scraping browserconst { url: inspectUrl } = await client.send('Page.inspect', { frameId });// open devtools URL in local chromeexec(`"${chromeExecutable}" "${inspectUrl}"`, (error) => {if (error) throw new Error('Unable to open devtools: ' + error);});// wait for devtools ui to loadawait delay(5000);};module.exports = {openDevtools,};
Note: on macOS, the chrome executable is const chromeExecutable = '/Applications/Google Chrome.app/Contents/MacOS/Google Chrome'
Now, from our scraper.js we have to call the openDevtools function
const page = await browser.newPage();console.log('Connected! Navigating to https://example.com...');// Add these 2 linesconst client = await page.target().createCDPSession();await openDevtools(page, client);...
Web scraping
The Web Scraping process involves 2 steps:
- Step 1: Interaction Interacting with the website to get to the page and state what we need. Ex: navigate to a URL, close any popups, write something in the search bar, press search, and wait for the results to load.
- Step 2: Parse Parse, usually an HTML document, and extract only the data we need.
Step 1: Interaction
The interaction step in web scraping usually mimics the interaction you do as a user on a website. Let’s follow the steps of searching for some flight prices at https://www.skyscanner.net/
We first have to input the search values in the form, then press search, and we are redirected to the results page. If we check the URL of the results page, we see that the data from the initial form is part of the URL.
Example URL: https://www.skyscanner.net/transport/flights/tfs/mad/231017/231021/
That means that in this case, we can skip the first form altogether, and simply create a url with the search fields we are interested in. But on some websites, that’s not possible and that’s where we have to simulate the user inputs and clicks to search the data we need.
Let’s create this URL inside the main function of our scraper based on function parameters.
const url = `https://www.skyscanner.net/transport/flights/${from}/${to}/${departDate}/${returnDate}/`;
Closing the popup
Skyscanner greets us with the privacy policy popup. Let’s find the accept button and press it.
// close privacy popupawait page.locator('#cookieBannerContent button').click();
Step 2: Parse
Now that we have navigated to the page we need to scrape, it is time to parse the page html source and extract the data we need.
Let’s start by finding all the flight options. If we inspect the page, we see that each option is an <a /> link with a class that starts with FlightsTicket_link. Let’s use this as a selector and find all these links from the page.
async function parseFlight(flight) {return {price: '$100'};}...// find an parse flight optionsconst flights = await page.$$('a[class^="FlightsTicket_link"]');const data = await Promise.all(flights.map(parseFlight));
We can parse the flight by selecting the element with the class Price_mainProceContainer
const price = await flight.$eval('[class^="Price_mainPriceContainer"]',(el) => el.textContent.trim());
Parse routes
To parse the details of the departure and return routes, let’s create a function for it
async function parseRoute(div) {let airlineSpan = await div.$('[class^="LogoImage_container"] span');let airline = await airlineSpan?.evaluate((el) => el.textContent.trim());if (!airline) {let airlineImg = await div.$('[class^="LogoImage_container"] img');airline = await airlineImg?.evaluate((el) => el.alt.trim());}const departAt = await div.$eval('[class^="LegInfo_routePartialDepart"] span',(el) => el.textContent.trim());const arriveAt = await div.$eval('[class^="LegInfo_routePartialArrive"] span',(el) => el.textContent.trim());const duration = await div.$eval('[class^="LegInfo_stopsContainer"] span',(el) => el.textContent.trim());return {airline,departAt,arriveAt,duration,};}
And, the prseFlight function, will find the 2 divs and parse their info
async function parseFlight(flight) {const price = await flight.$eval('[class^="Price_mainPriceContainer"]',(el) => el.textContent.trim());const [toDiv, fromDiv] = await flight.$$('[class^="UpperTicketBody_legsContainer"] > div');const to = await parseRoute(toDiv);const from = await parseRoute(fromDiv);return {price,to,from,};}
Scraping summary
Our scraper is ready. Based on a set of inputs, it opens Skyscanner using the Scraping browser, navigates to the right page, and scrapes the data about flight prices.
The next step, is to put it behind an API and from our React Native app, trigger the scrapper.
NodeJS API
The scraping is done, but we need a way to trigger the scraper from our React Native app. For that, we will create a simple REST API with one endpoint.
To create the API in NodeJS, we will use Express. Let’s install it
npm install express --save
Now, create the index.js file, and set up the Hello World server
const express = require('express')const app = express()const port = 3000app.get('/', (req, res) => {res.send('Hello World!')})app.listen(port, () => {console.log(`Example app listening on port ${port}`)})
Let’s add a script inside package.json to help us run the server
"scripts": {..."dev": "node --watch index.js"}
Now, we can start our server by running npm run dev .
Open http://localhost:3000/ and you should see the Hello world.
Search endpoint
Let’s add the search endpoint to our API, which will receive a set of parameters, and will trigger the scraper.
app.get('/search', async (req, res) => {console.log(req.query);const { from, to, departDate, returnDate } = req.query;if (!from || !to || !departDate || !returnDate) {res.status(400).send('Inputs are missing');return;}try {const data = await scrapeFlights(from, to, departDate, returnDate);res.json(data);} catch (e) {res.status(500).send('Failed to search flights with this inputs!');}});
From the scraper file, make sure to delete the part that calls the main function, rename the main function to srapeFlights, and export the function
// async function main(from, to, departDate, returnDate) {async function scrapeFlights(from, to, departDate, returnDate) {// main().catch(err => {// console.error(err.stack || err);// process.exit(1);// });module.exports = {scrapeFlights,};
Now, we can open the /search endpoint, and in a couple of seconds, we should see a list of flight options.
http://localhost:3000/search?from=TFS&to=MAD&departDate=231220&returnDate=231229
Integrate React Native with the Backend
In the previous step, we created our scraper and we saw how we can send an API request to search for flight prices. Now, we simply have to connect it to our React Native application and get the data there.
We will use the fetch API, available in React Native, to send the request for initiating the job, and request the results of a job.
Let’s create a separate file for this low-level logic services/api.js
import dayjs from 'dayjs';const url = 'http://localhost:3000';export async function searchFlights({ from, to, departDate, returnDate }) {try {const response = await fetch(`${url}/search?from=${from}&to=${to}&departDate=${dayjs(departDate).format('YYMMDD')}&returnDate=${dayjs(returnDate).format('YYMMDD')}`);if (response.status !== 200) {return { error: 'Failed to search', data: [] };}return { data: await response.json() };} catch (e) {return { error: 'Network error', data: [] };}}
In App.js call this function when the user presses on Search
const [items, setItems] = useState([]);const [loading, setLoading] = useState(false);const onSearch = async (data) => {setLoading(true);setItems([]);const response = await searchFlights(data);if (response.error) {Alert.alert(response.error);} else {setItems(response.data);}setLoading(false);};
It’s also a good practice to show a loading indicator while waiting for the data
{loading && (<View style={{ flexDirection: 'row', padding: 10 }}><ActivityIndicator /><Text> Searching for the best prices...</Text></View>)}
Project summary
Congratulations 🎉
I hope that you have managed to follow along with this project-based tutorial and that you have learned something new today.
This is just the starting point for this price comparison app. The sky is the limit of what features you can add here, and maybe even build a real app around this use case. Go for it.
Some ideas you can implement:
- Scrape multiple price aggregators (Kayak, kiwi, travel.com, etc.)
- Scrape directly airline websites
- Scrape the same website from different countries to compare local prices as well. BrightData allows you to choose the country for the proxies it uses.
- Parse more data about the flights: number of stops, total duration, etc.
- Implement sorting methods for the cheapest and the fastest options
- Expand the search to cities and countries, not only airports
- (Advanced) Price alerts: let users subscribe to price alerts, and email them when your scrapers find a better price.
You don’t have to stop on the flights. If you are interested in this topic, you can do the same for hotels, vacations, car rentals, real estate deals, and e-commerce products.
Good luck & Keep building exciting apps 💛