
Introduction
Expo Router was launched at the beginning of this year, and it has already changed how we implement navigation in React Native apps.
Expo Router v2 was launched recently as part of Expo SDK 49 and comes with a lot of improvements on top of the existing features, but it also surprises us with additional features like Static Site Generation for the web, and much more.
- Automatically Typed Routes
- Static Routes and SEO-optimized web apps
- CSS support
- Async Routes
Let’s see how will these updates help us, and what new possibilities we get with the new features like Static Routes. We will do that based on a real project.
For this tutorial, we will use the same project we started during Expo SDK 49. Check it out to explore and build an app with the latest version of Expo SDK.
Asset Bundle
The Asset bundle contains the source code of the starting project and other required resources.
Download Asset BundleWhat’s Expo Router?
Expo Router is a file-based navigation system for React Native apps built by Expo. It simplifies how we implement navigation by automatically creating screens for every file inside the app directory.
Setup the starter project
From the asset bundle, unzip the Apods-Part1.zip folder and open it in your editor.
Install the dependencies using npm i and then start the development server using npm start.
From the terminal, we can either scan the QR code with our physical device, or run the application on Android Emulator (press a), on iOS Simulator (press i), or even on the web (press w)
Starting from scratch
Alternatively, if you want to start a project from scratch using Expo Router v2, you can use
npx create-expo-app@latest ProjectName -t tabs@sdk-49
If you are integrating Expo Router in an existing project, follow the installation documentation.
The app directory can be moved inside src
I will start with probably the smallest update, which still makes me happy. We can now move the app directory inside the src folder, and this way, keep all the source code of our application together, in the src directory.
🔔 When you move the location of the app, make sure to update the imports inside your screens to match the new location.
Aliased Imports
Docs: https://docs.expo.dev/guides/typescript/#path-aliases
Alliased imports are introduced in SDK 49 and help us get rid of spaghetti imports.
import Button from '../../../src/components/Button'; // 💩 relative importimport Button from '@/components/Button; // 🔥 aliased import
To enable them add this to app.json
{"expo": {..."experiments": {"tsconfigPaths": true}}}
Now, add the list of aliases to tsconfig.json
"compilerOptions": {"baseUrl": ".","paths": {"@/*": ["src/*"]}},
And then, update the imports to match the new alias. For example:
import FullScreenImage from '@/components/FullScreenImage';
Absolute imports
Absolute imports are also now possible, and they will be relative to the baseUrl property from tsconfig.json
import FullScreenImage from 'src/components/FullScreenImage';
Automatically Typed Routes 😍
In React Navigation, one of the most frustrating challenges was to properly type all routes and screens.
Expo Router V2 does this automatically for you ✨
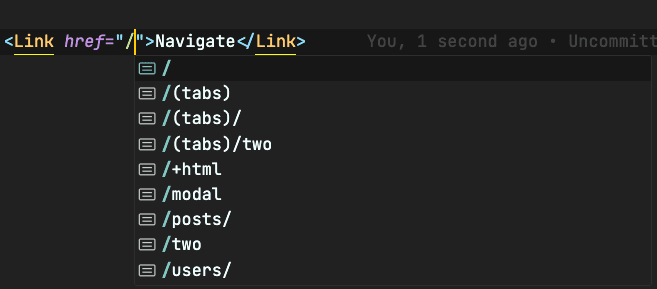
When you start typing the URL, you get autocomplete for available paths.
It also works great for dynamic routes as well, and it correctly assigns the type of our dynamic path parameters when taking them from useLocalSearchParams or useGlobalSearchParams.

🔔 If you have a "catch-all" file for the 404 screen (ex: app/[...missing].tsx), then it will affect the possible types of routes. In other words, typescript will validate absolutely any route, because any string that is not a valid URL, will be handled by that 404 file. This way, you lose some of the benefits of typed routes.
Dynamic detailed page
Let’s create a new page, that will render the details of an Apod (Astronomy Picture of the day) based on a date. The date will be the dynamic parameter of the URL.
We will need to query the Nasa api based on a date. Let’s add this to src/api/apods.ts
export const fetchApod = async (date: string): Promise<Apod> => {try {const res = await fetch(`${BASE_URL}&date=${date}`);return await res.json();} catch (e) {console.log('Error fetching pictures: ', e.message);return null;}};
Now, add the file for the new detailed page inside src/app/apod/[date].tsx
import { Text, ActivityIndicator } from 'react-native';import { useEffect, useState } from 'react';import { useLocalSearchParams } from 'expo-router';import { Apod } from '@/types';import { fetchApod } from '@/api/apods';import ApodListItem from '@/components/ApodListItem';import { ScrollView } from 'react-native-gesture-handler';const ApodDetailsScreen = () => {const { date } = useLocalSearchParams();const [apod, setApod] = useState<Apod>(null);useEffect(() => {fetchApod(date).then(setApod);}, [date]);if (!apod) {return <ActivityIndicator />;}return (<ScrollView><ApodListItem apod={apod} /><Textstyle={{padding: 15,backgroundColor: 'white',lineHeight: 22,fontSize: 16,maxWidth: 500,width: '100%',alignSelf: 'center',}}>{apod.explanation}</Text></ScrollView>);};export default ApodDetailsScreen;
Async Routes
Lazy loading is a great way to improve the initial performance of an application, and load "things" only when the user needs them.
For example. if you have 4 tabs, and all tabs are fetching some heavy data, you can lazy load the data only when the user visits that tab. That is lazy loading on the data fetching layer.
Now, what about Async Routes?
Async routes is lazy loading of the actual javascript bundle for a specific screen. That means that when you open the application, it will only load in memory the code for that screen. When we navigate to a new route, only then it will load the code in memory, and cache it for later.
How will it help us?
It will speed up the development time. We will have to wait less time when running our app because the initial bundle size will be way smaller.
It will also improve the time to launch the application for the first time.
This is a game changer for huge apps, with a lot of screens, that previously took a lot of time to bundle and load all the screens in memory.
Internally, Facebook has been using a similar mechanism for years, and now we also have this option.
Follow the docs to implement them in our project.
Static Site Generation
This is a game changer for React Native developers that also target the web.
Previously, you could export your Expo Web app as a SPA (single-page application). The problem with SPAs, is bad SEO (Search Engine Optimization), because web crawlers like Google, do not execute the javascript of your application. They only index your site based on static files like HTML.
With Static Routes introduced to Expo Router 2, we can render all routes at build time and generate static html files. The generated static site can be hosted on any web server (ex: Vercel, Netlify, AWS Amplify, etc.).
- Follow the initial setup from the docs
- Set the expo.web.output to "static" inside app.json
- Generate your static website: npx expo export --platform web
- Serve the website using npx serve dist
Dynamic pages
Dynamic pages will not be statically generated by default because expo doesn’t know what are the possible values for the dynamic segment from the url.
We have to export a function called generateStaticParams from our dynamic page, and in that function, return an array where each item represents the search params of one screen.
Check out the example shown in the live stream. It will make more sense.
Root HTML
You can customize the root HTML file by creating an app/+html.tsx file in your project.
With this, we can add global meta tags, global js scripts like analytics, and more.
Page-specific meta information using <Head />
There is a new component 'expo-router/head' that helps us adjust information in the head for each page.
Deploy
The generated project can be hosted on any standard web server like Netlify, AWS Amplify, Vercel, Github Pages.
CSS and Styling
Expo introduces first-class support for CSS to style our web apps. That means that now, we can use CSS files from our project or import from node_modules, we can use CSS supersets like Sass and SCSS and even Tailwind 🤩.
At this moment, CSS is only supported for the web, and if you want to use it, you will have to write the styles twice, if you are targeting both web and mobile.
Conclusion
Expo Router is changing the way we build universal web and mobile applications, and it’s just getting started.
Let me know what features are you most excited about from Expo Router v2.