
Introduction
Let’s build a full-stack Virtual Events application with React Native and Nhost. Shall we?
You can follow this build in video format here:
If you want to follow along, and build this application yourself, make sure to download the Asset bundle that contains all the dummy data, pre-defined components, PDF presentation and more.
Download the Asset Bundle 👇
To get the Source Code, PDF guide, dummy data, images, etc.
Context
This project is part of the notJust.Hack event, and the goal is to show you that it is possible to build a functional full-stack application in just 3 days.
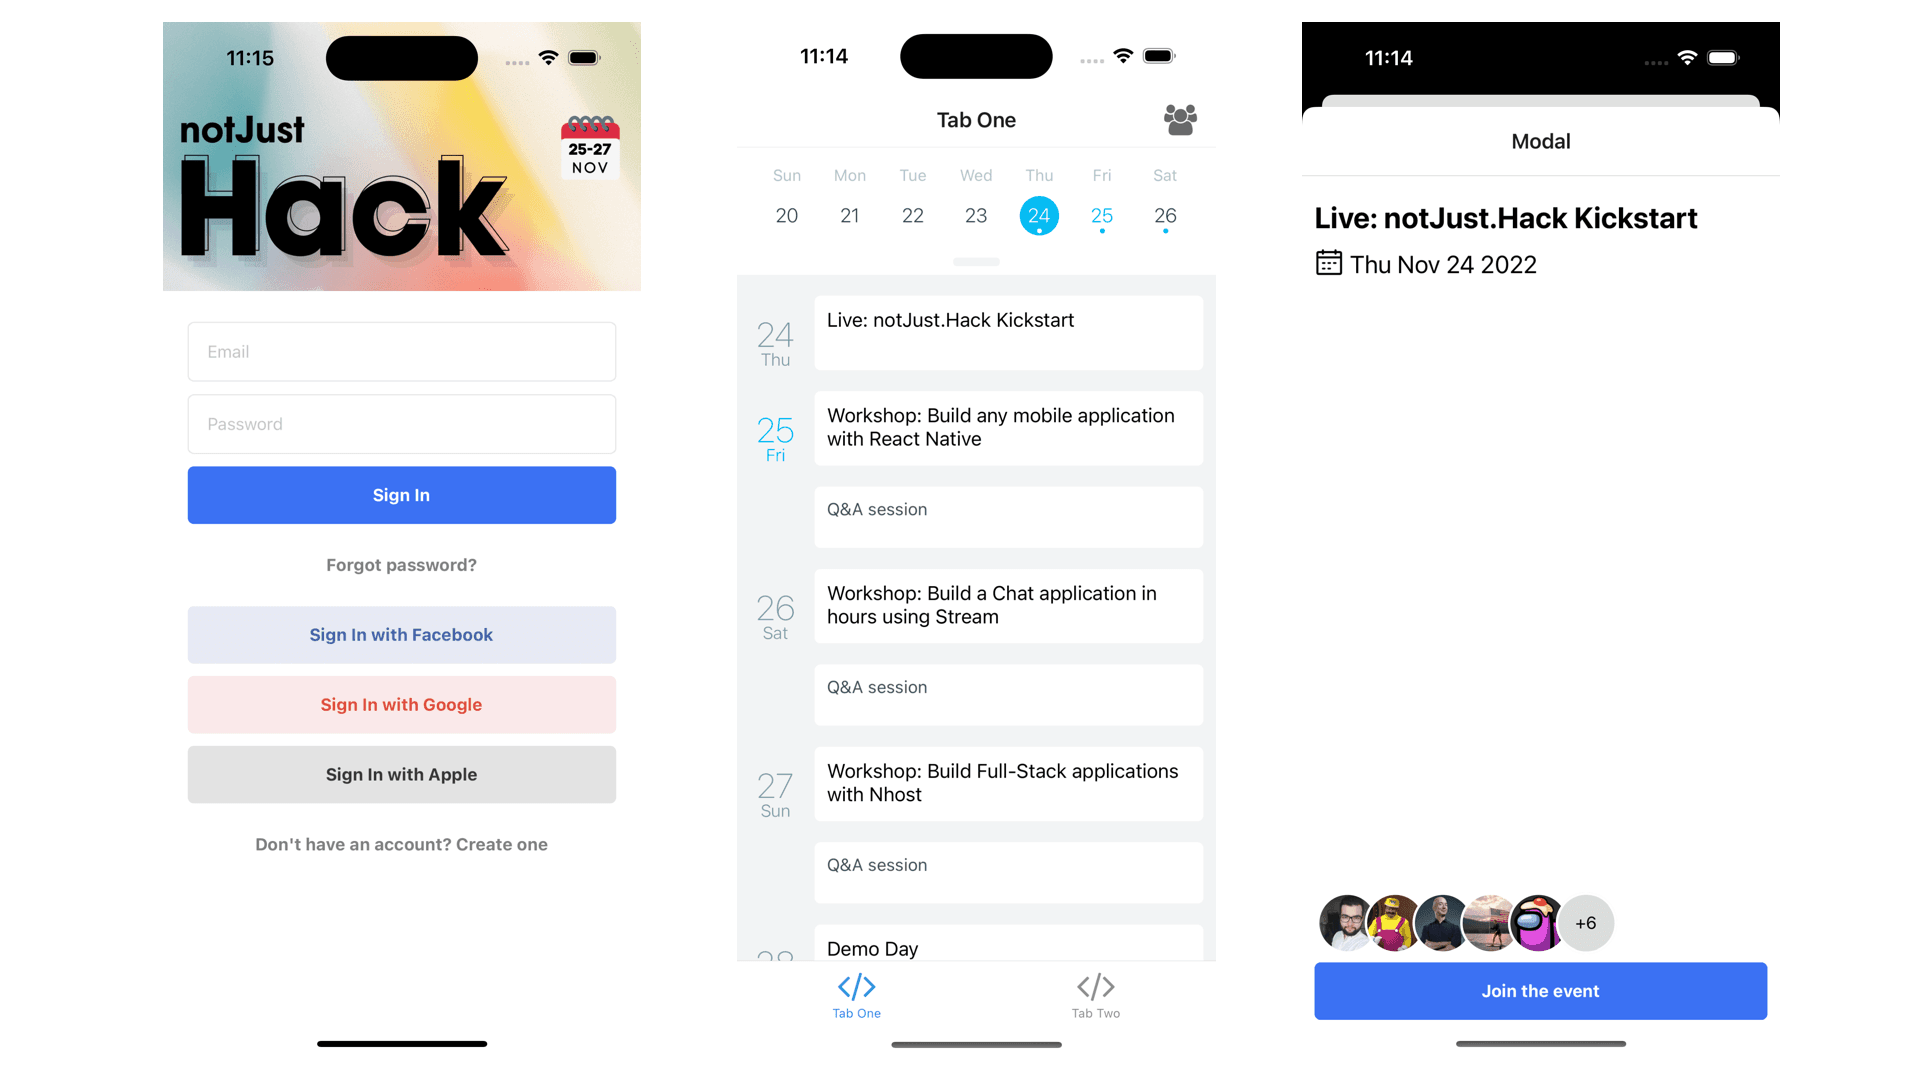
In the first part, we built the UI of our Virtual Events Application. We have the User interface ready for the most important screens of the application:
-
Schedule and Calendar
-
Session details page
-
Profile
-
Auth screens
The goal for today
Today we will work on the backend side of our application.
We will implement:
✅ Authentications
✅ Database & GraphQL API
✅ Apollo Client
We will use Nhost which is an open-source alternative to Firebase, leveraging the power of GraphQL. Nhost provides all the APIs, services, and SDKs you need to build apps users love.
This tutorial is sponsored by Nhost, but I am sure you will take a lot of value out of it.
Go from a side project to a successful business in a few days. Try Nhost for Free!
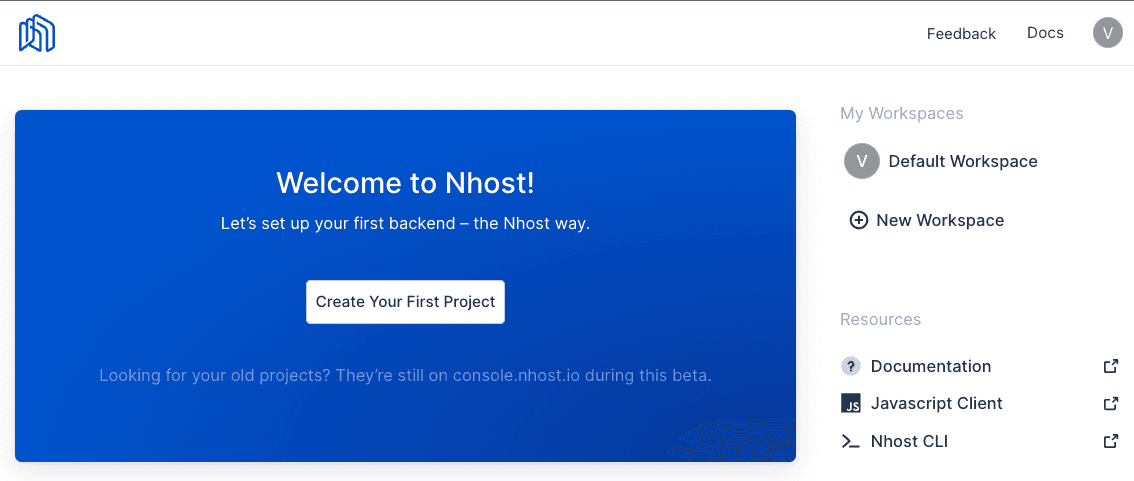
Let’s create our Nhost app
-
Create your free account on Nhost
-
Create your first project
Install and setup Nhost
Check out Nhost docs for more details.
-
Install
BASHnpx expo install @nhost/react graphql expo-secure-store -
Configure NhostClient inside App.tsx
JAVASCRIPTimport { StatusBar } from 'expo-status-bar';import { SafeAreaProvider } from 'react-native-safe-area-context';import useCachedResources from './hooks/useCachedResources';import useColorScheme from './hooks/useColorScheme';import Navigation from './navigation';import { NhostClient, NhostReactProvider } from '@nhost/react';import * as SecureStore from 'expo-secure-store';const nhost = new NhostClient({subdomain: '',region: '',clientStorageType: 'expo-secure-storage',clientStorage: SecureStore,});export default function App() {const isLoadingComplete = useCachedResources();const colorScheme = useColorScheme();if (!isLoadingComplete) {return null;} else {return (<SafeAreaProvider><NhostReactProvider nhost={nhost}><Navigation colorScheme={colorScheme} /></NhostReactProvider><StatusBar /></SafeAreaProvider>);}}
Authentication
Nhost Authentication docs
Sign Up
Create a user on the SignUpScreen.tsx
import { useSignUpEmailPassword } from "@nhost/react";const SignUpScreen = () => {...const { signUpEmailPassword, isLoading } = useSignUpEmailPassword();const onRegisterPressed = async (data) => {if (isLoading) {return;}const { name, email, password, isSuccess } = data;const { error } = await signUpEmailPassword(email, password, {displayName: name.trim(),metadata: { name },});if (error) {Alert.alert("Oops", error.message);}if (isSuccess) {navigation.navigate("SignIn");}};...}
Sign In
Log in the user inside the SignInScreen.tsx
import { useSignInEmailPassword } from "@nhost/react";const SignInScreen = () => {...const { signInEmailPassword, isLoading } = useSignInEmailPassword();const onSignInPressed = async (data) => {if (isLoading) {return;}const { email, password } = data;const { error, needsEmailVerification } = await signInEmailPassword(email, password);if (needsEmailVerification) {Alert.alert("Verify your email","Check your email for a confirmation link");}if (error) {Alert.alert("Couldn't sign in!", error.message);}};...}
- You can also disable the email verification checks from the Nhost Dashboard → Settings → Sign-In Methods → Require Verified Emails.
Protected Routes
Add protected routes in navigation/index.ts based on isAuthenticated status.
import { useAuthenticationStatus } from "@nhost/react";function RootNavigator() {const { isAuthenticated, isLoading } = useAuthenticationStatus();if (isLoading) {return <ActivityIndicator />;}return (...)}
Profile page
Update the TabTwoScreen.tsx
import { useSignOut, useUserData } from "@nhost/react";export default function TabTwoScreen() {const { signOut } = useSignOut();const user = useUserData();return (...)}
Database
Nhost Database docs.
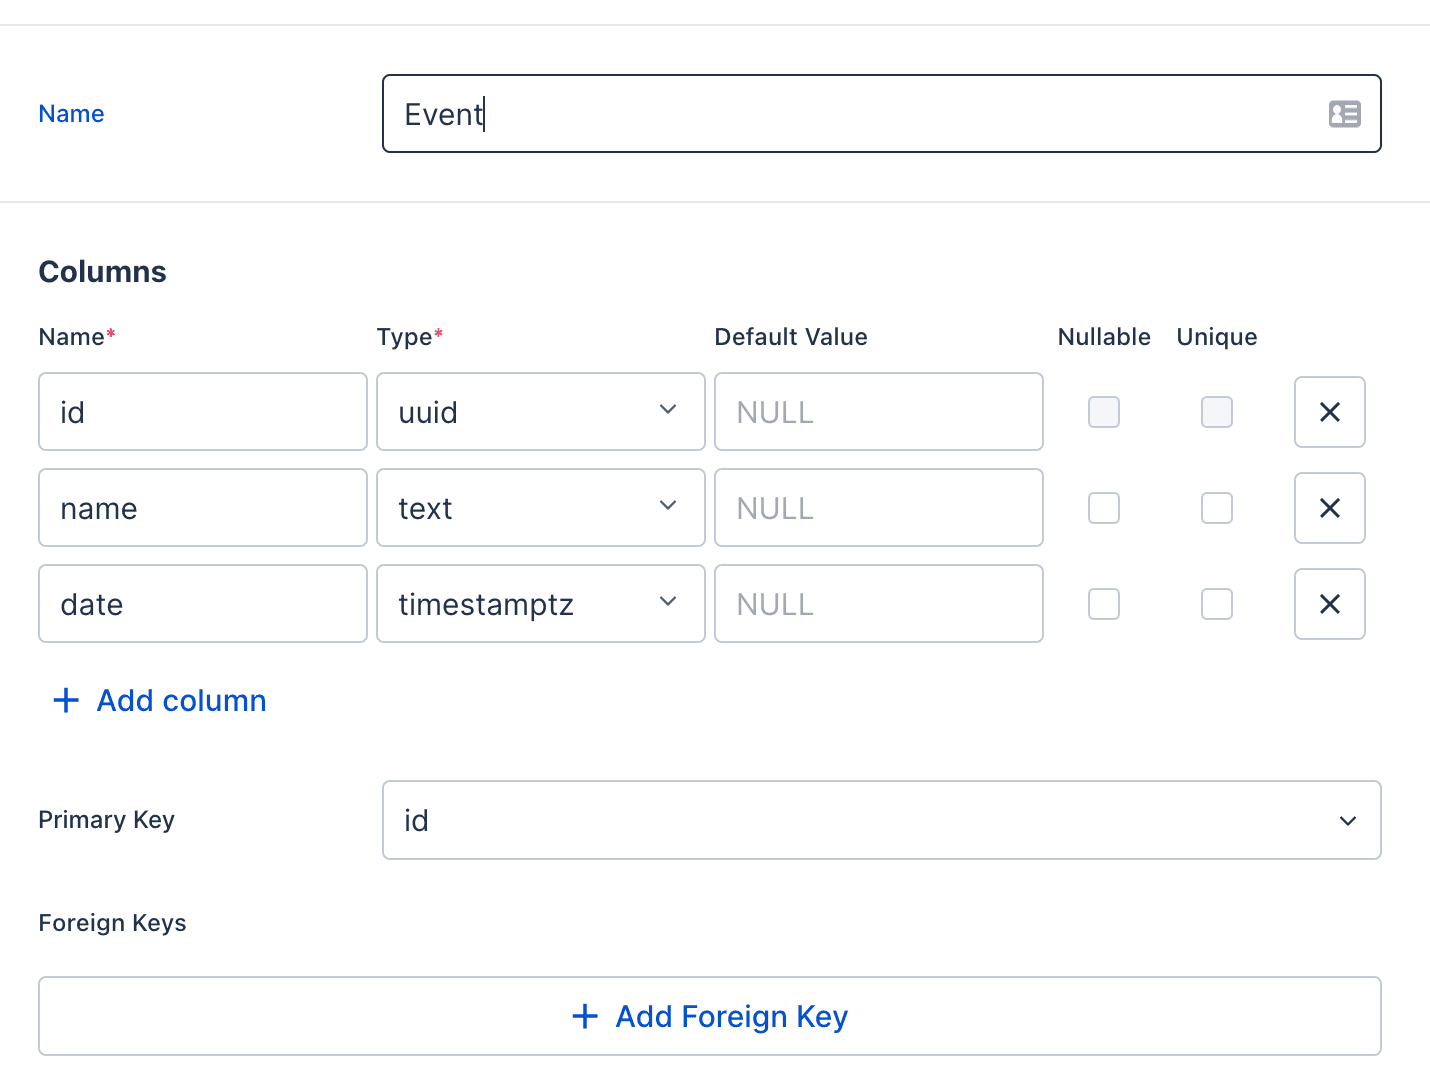
Events table
For this application, we will start with 2 tables: Event and EventAttendee.
The Event table will contain information about one event session (ex: a workshop)
Let’s create the Event table
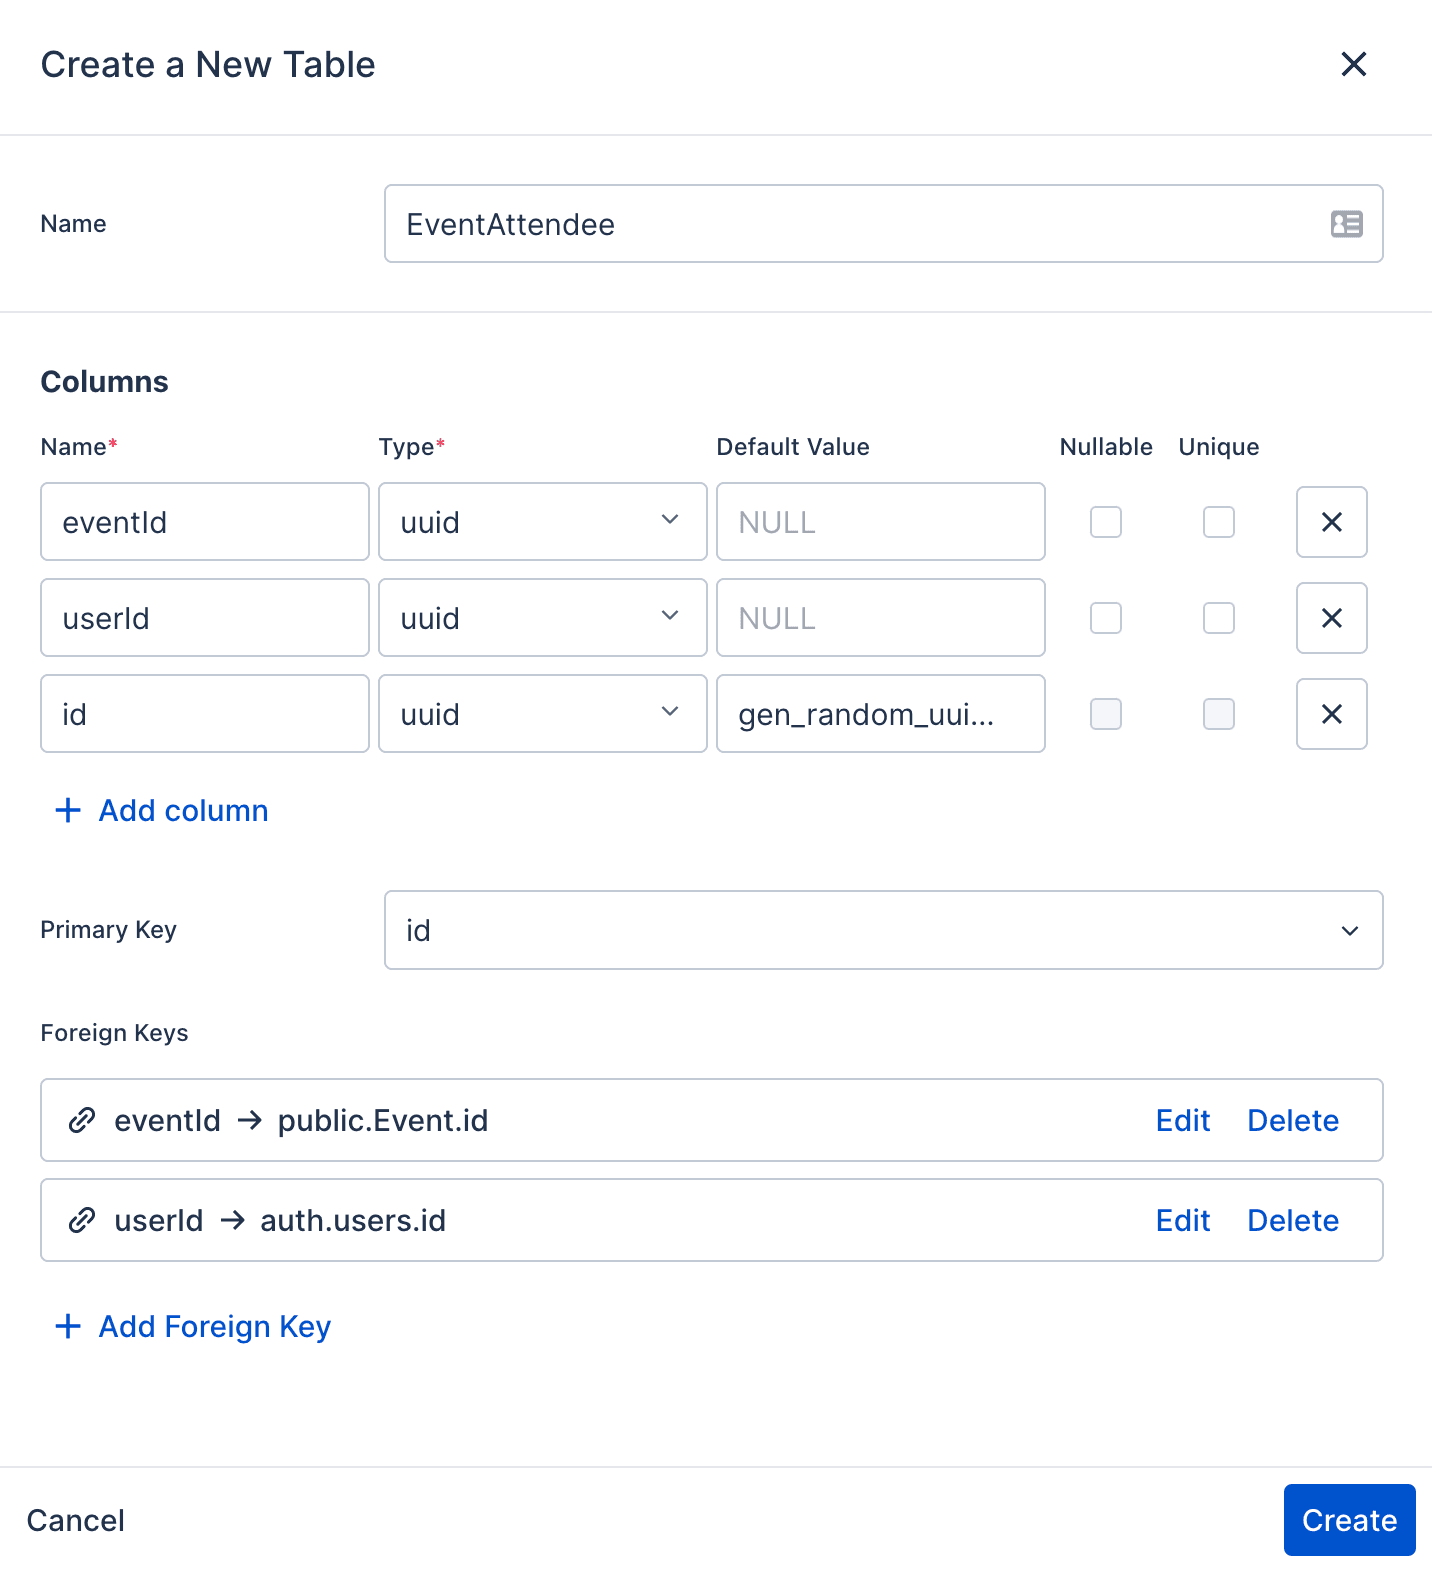
Event Attendees
Users will be able to register for events that they are interested in. That means that we will need a many to many relationship between Users and Events, because one use can register for multiple events, and one event can have many attendees. To design a many to many relationship, we need a Pivot table EventAttendee between Users and Events where every row in the pivot table will represent the registration of one user at one event.
That’s why, the only fields we need in this table, is the userId and the eventId.
We will also create foreign keys, to link this table with the User and Event table.
Let’s Create the EventAttendee
GraphQL API
Nhost GraphQL API docs
Let’s explore the GraphQL tab from Nhost dashboard. After adding some events manually in the database, you can query them with the next query
Event {idnamedate}
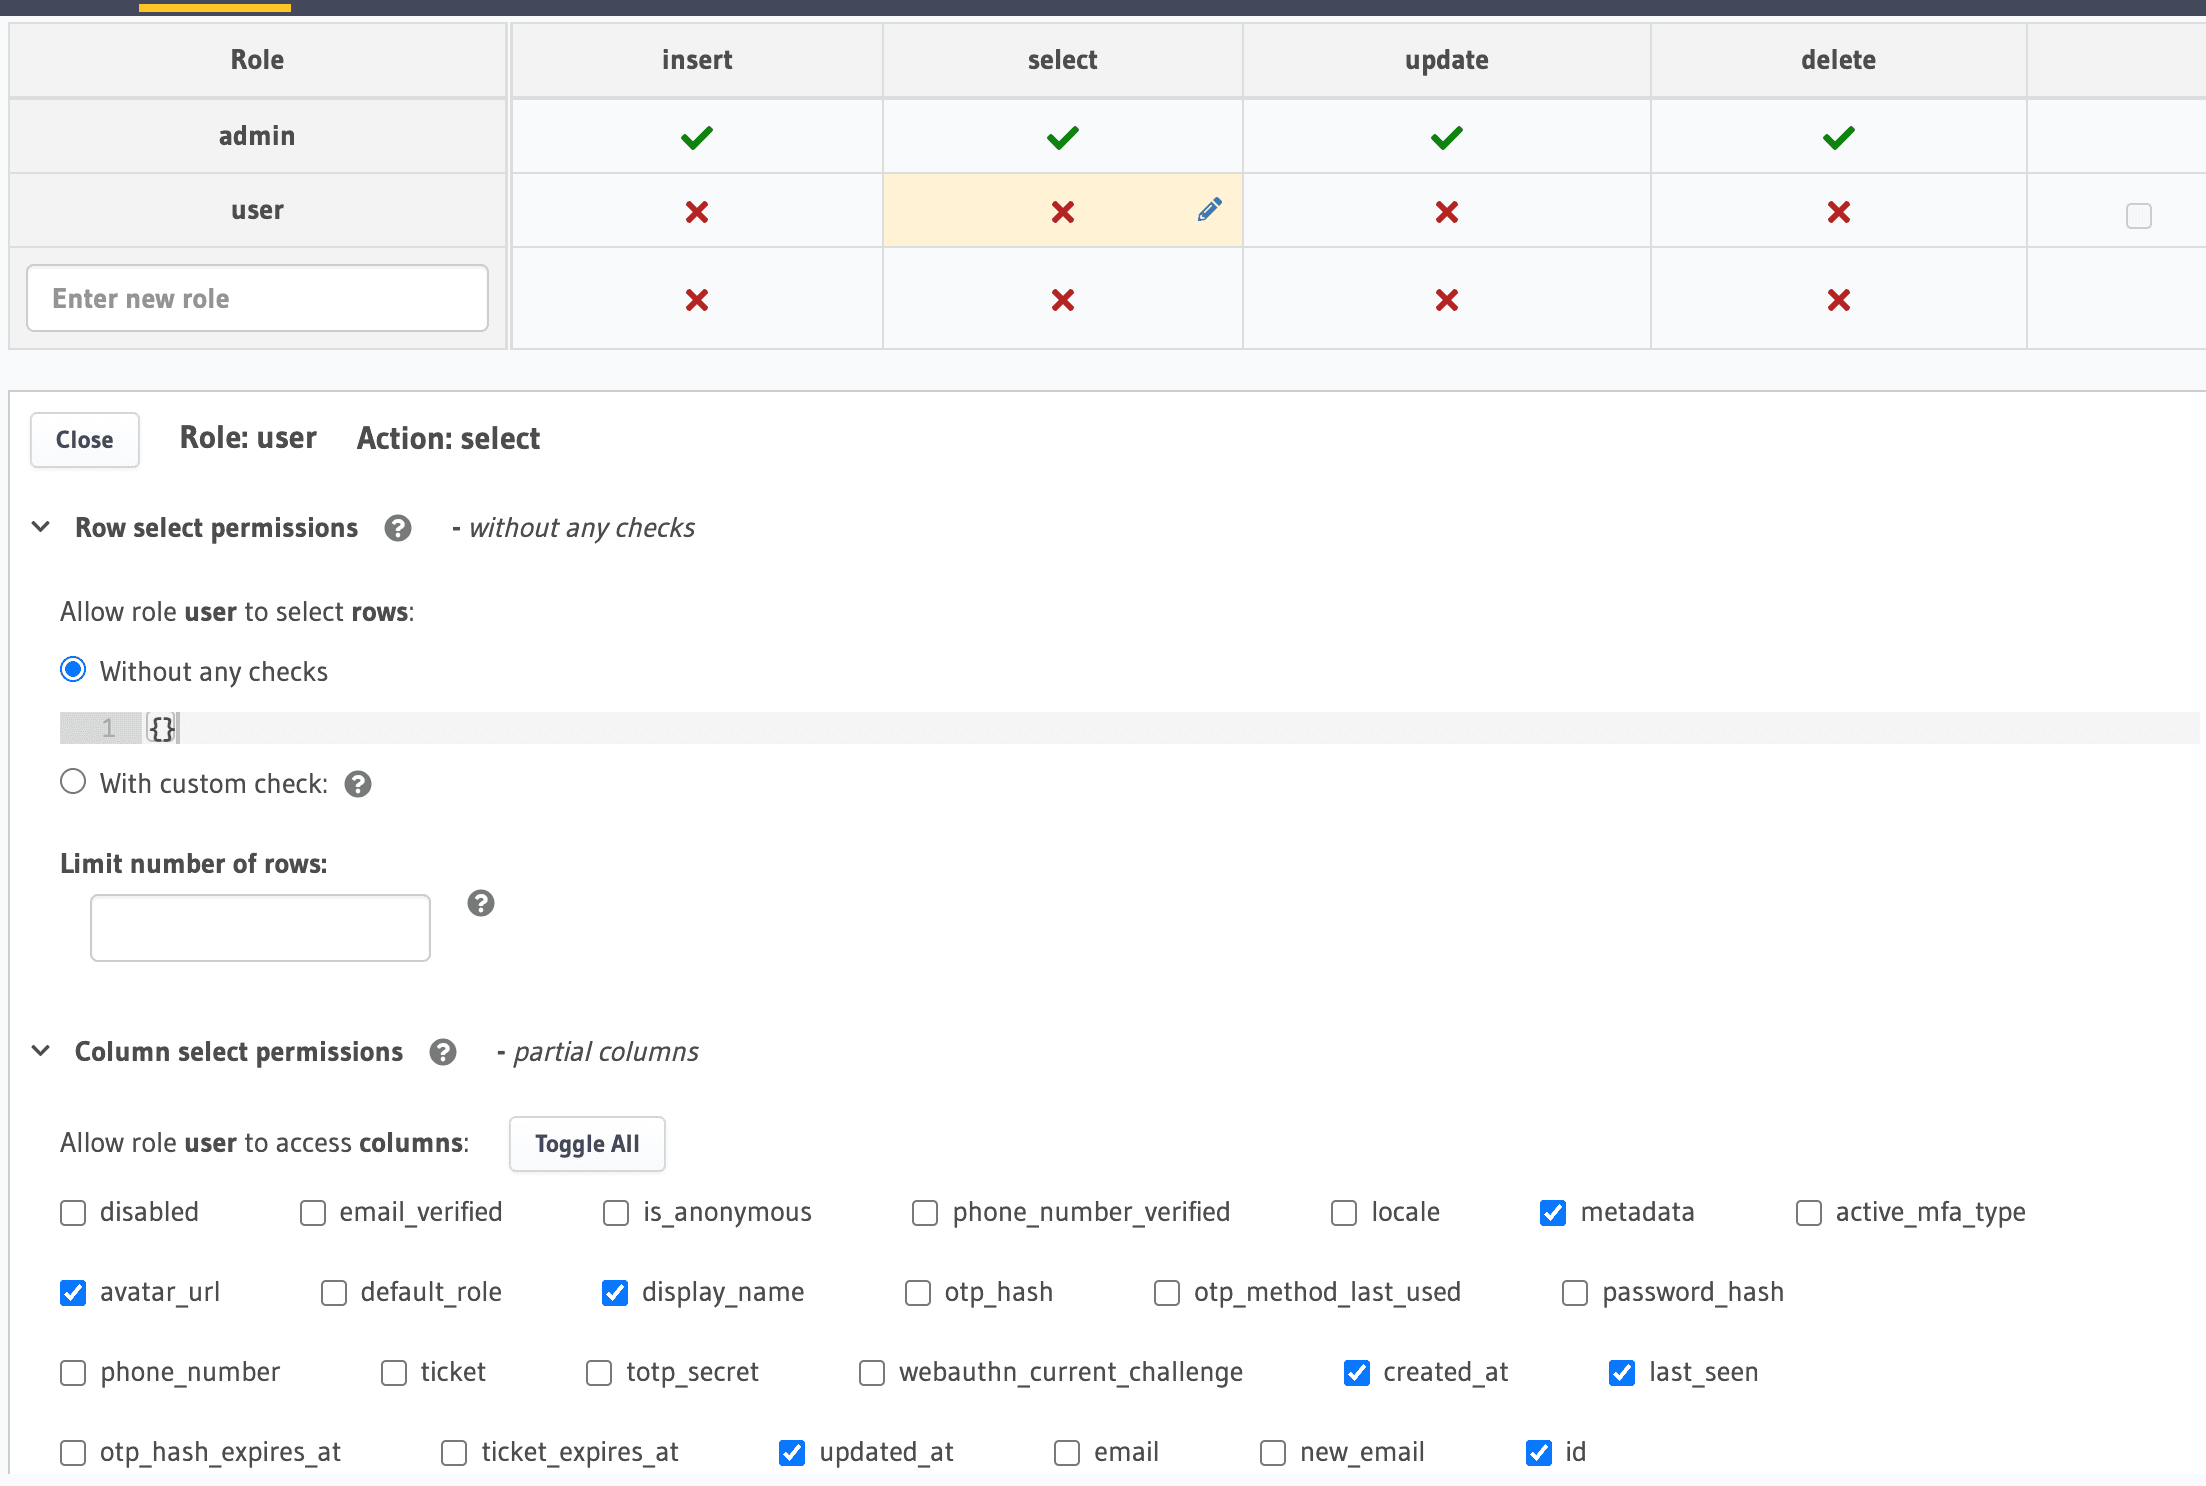
Permissions
Nhost Permissions docs.
So far, we have ran the queries as Admin, but if we will want to run the queries as User, we will get an error.
That’s because For each role, we have to create rulesfor the different operations.
Give permissions to the user using Hasura dashboard for all the necessary operations
-
First, give users permission to query the user database from Hasura dashboard
Query the GraphQL API with Apollo
To query the GraphQL API that we just created using Nhost, we will use Apollo Client. This is a powerful querying and caching library that will help manage the remote data.
- Install Apollo Client
npx expo install @nhost/react-apollo @apollo/client -- --legacy-peer-deps
- Add the Apollo Provider inside App.tsx
import { NhostApolloProvider } from "@nhost/react-apollo";...<NhostReactProvider nhost={nhost}><NhostApolloProvider nhost={nhost}><Navigation colorScheme={colorScheme} /></NhostApolloProvider></NhostReactProvider>
Query Users
GraphQL query to get the list of users
query GetUsers {users {iddisplayNameavatarUrl}}
Query the list of users inside UsersScreen.tsx
import { ActivityIndicator, FlatList, Text } from 'react-native';import UserListItem from '../components/UserListItem';import { gql, useQuery } from '@apollo/client';const GetUsers = gql`query GetUsers {users {iddisplayNameavatarUrl}}`;const UsersScreen = () => {const { data, loading, error } = useQuery(GetUsers);if (loading) {return <ActivityIndicator />;}if (error) {return <Text>{error.message}</Text>;}return (<FlatListdata={data.users}renderItem={({ item }) => <UserListItem user={item} />}/>);};export default UsersScreen;
Query events
GraphQL query to get the list of events
query GetEvents {Event {idnamedate}}
Query the list of events, inside TabOneScreens.tsx
import { gql, useQuery } from "@apollo/client";const GetEvents = gql`query GetEvents {Event {idnamedate}}`;export default function TabOneScreen({navigation}: RootTabScreenProps<"TabOne">) {const { data, loading, error } = useQuery(GetEvents);...if (loading) {return <ActivityIndicator />;}if (error) {Alert.alert("Error fetching events", error.message);}
As we can see, the data contains an array of events, but for the Agenda component, we need the data in a different format.
For that, let’s create a helper function that will receive an array of events, and will group them by days.
export const getEventsSchedule = (events: []): AgendaSchedule => {const items: AgendaSchedule = {};events.forEach((event) => {const day = event.date.slice(0, 10);if (!items[day]) {items[day] = [];}items[day].push({ ...event, day, height: 50 });});return items;};
Query event by id
GraphQL Query to get one event
query GetEvent($id: uuid!) {Event_by_pk(id: $id) {idnamedate}}
Query the event information inside ModalScreen.tsx
import { gql, useQuery } from "@apollo/client";const GetEvent = gql`query GetEvent($id: uuid!) {Event_by_pk(id: $id) {idnamedate}}`;...const { data, loading, error } = useQuery(GetEvent, { variables: { id } });const event = data?.Event_by_pk;if (error) {return (<View style={styles.container}><Text style={styles.title}>Couldn't find the event</Text><Text>{error.message}</Text></View>);}if (loading) {return <ActivityIndicator />;}
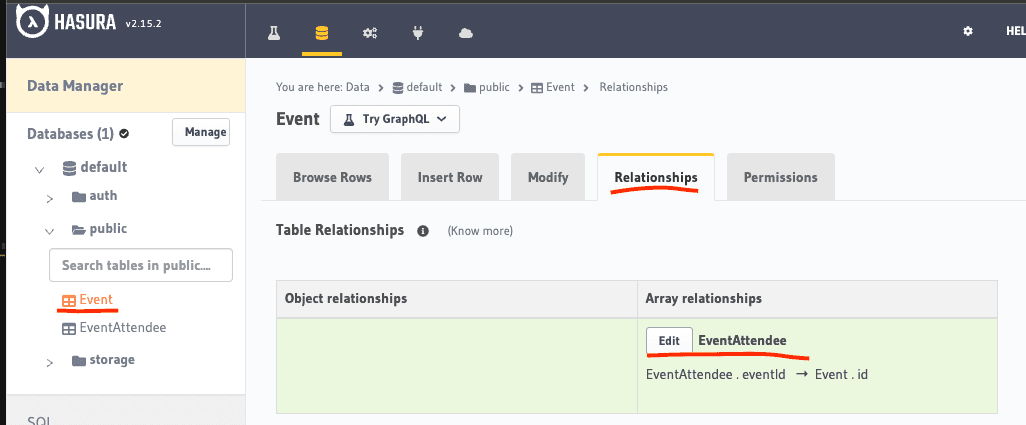
Event Attendees
We have created the relationships:
- EventAttendee ⇒ Event
- EventAttendee ⇒ User
That will help use query the details about the user and the event from the EventAttendee type.
If we want to query the list of EventAttendees from an Event, we need to create an array relationship. We can do that, from Hasura dashboard
Join events
To join an event, we will have to execute a mutation to create a new EventAttendee entry with our user id and the event’s id.
GraphQL Mutation to create a new EventAttendee
const JoinEvent = gql`mutation InsertEventAttendee($eventId: uuid!, $userId: uuid!) {insert_EventAttendee(objects: [{ eventId: $eventId, userId: $userId }]) {returning {iduserIdeventIdEvent {idEventAttendees {id}}}}}`;
Now, let’s define the mutation at the top of our component
const [doJoinEvent] = useMutation(JoinEvent);
Get the userId
import { useUserId } from "@nhost/react";...const userId = useUserId();
And then, execute the mutation by calling doJoinEvent function inside onJoin
const onJoin = async () => {try {await doJoinEvent({ variables: { userId, eventId: id } });} catch (e) {Alert.alert("Failed to join the event!", (e as Error).message);}};
Query event attendees
To query the event with its attendees, we will update the GetEvent query to include this information
const GetEvent = gql`query GetEvent($id: uuid!) {Event_by_pk(id: $id) {idnamedateEventAttendees {user {iddisplayNameavatarUrl}}}}`;
Get the displayedUsers from our event data
const displayedUsers = (event?.EventAttendees || []).slice(0, 5).map((attendee) => attendee.user);
Hide the join button, if we are already an attendee
const joined = event?.EventAttendees?.some((att) => att.user.id === userId);{!joined ? <CustomButton text="Join the event" onPress={onJoin} /> : null;}
Hurray 🎉
Congrats, you have successfully build a full-stack mobile application using React Native and Nhost.
If you enjoyed working with Nhost, make sure to give them Star ⭐ on GitHub.